Tag Archives: Christmas

Brown Sugar Sweet Potato Pie

23 Dec

Two days till Christmas! Are you ready? I’m not. Working on it though. I am so excited to have the next two weeks off work. After last-minute Christmas prep and then holiday celebrations with family, I’m going to enjoy a nice staycation through the new year. I don’t usually get this much time off, so my holiday spirits are pretty high right now.

I finished my Christmas shopping pretty early this year — that was the one thing I was on top of. (We don’t even have a tree!) This last minute, I think I’m just going to skip the decorating this year. So all that’s left is baking, which is happening all day today, so look forward to some post-Christmas blog posts with delicious treats! Oh, and I’m going to put on my favorite Christmas music and wrap presents today — I’ve been putting it off only because wrapping presents is my favorite, and I wanted to keep looking forward to it!

IMG_2984

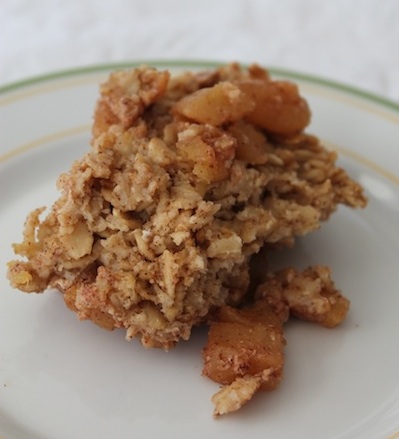
Need some last-minute inspiration for holiday baking? Try a sweet potato pie! I’m not sure I had ever eaten sweet potato pie before, much less made one. But one of the BF’s friends gave him a whole bag of sweet potatoes from her family’s farm, so we added sweet potato pie to our traditional apple pie for Thanksgiving. This pie, topped with a little whipped cream, would make a great dessert any night or would be delicious enough for a classic Thanksgiving or Christmas spread.

IMG_2989

Classic and tasty, give this a try! Making the sweet potatoes from scratch really wasn’t so hard. I made my pie in a tart pan, which I thought was super cute. I had some extra filling, so I whipped up a little bit of graham cracker crust, pressed it into the bottoms of a mini muffin pan with my dough tamper (the small end fits perfectly in a mini muffin cup), and used the extra filling to make mini pie bites.

IMG_2995

Oh, and a little update:

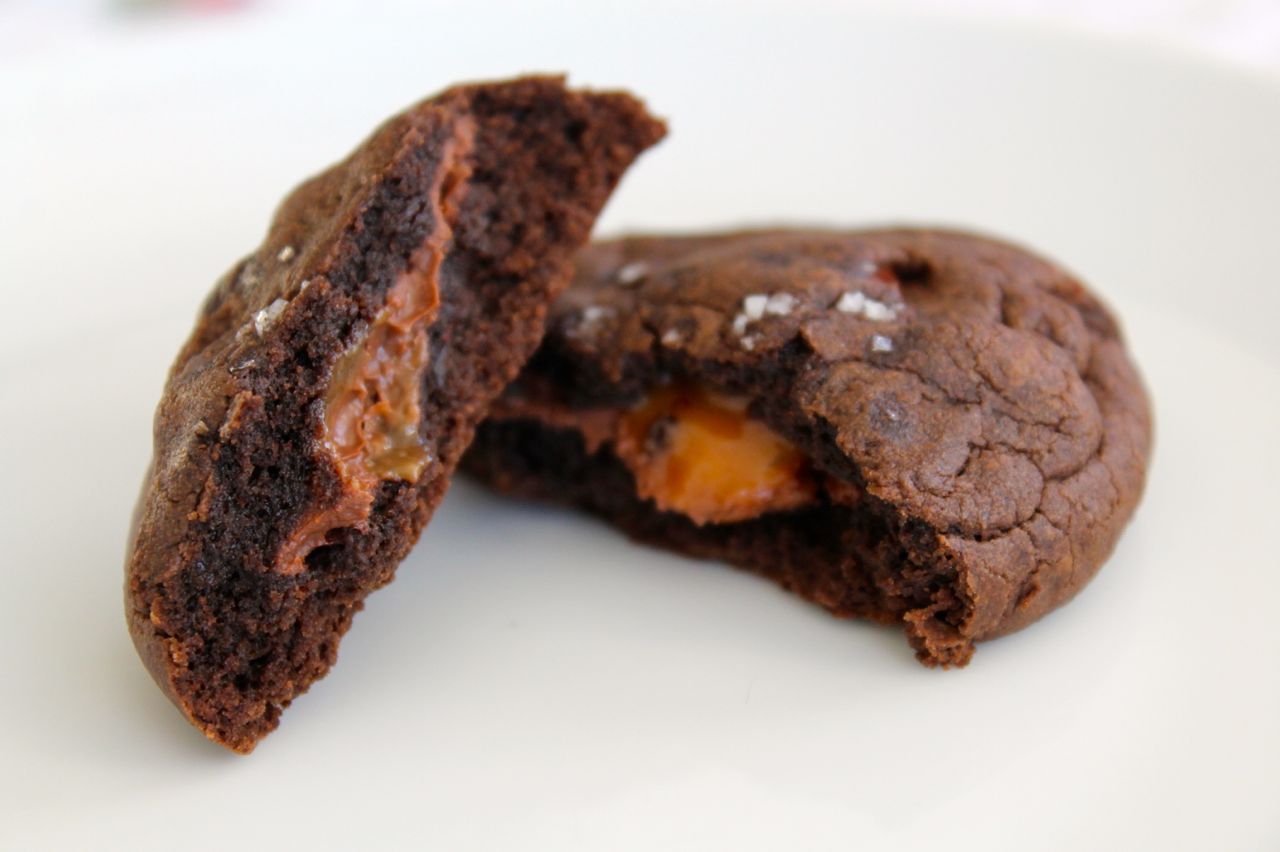
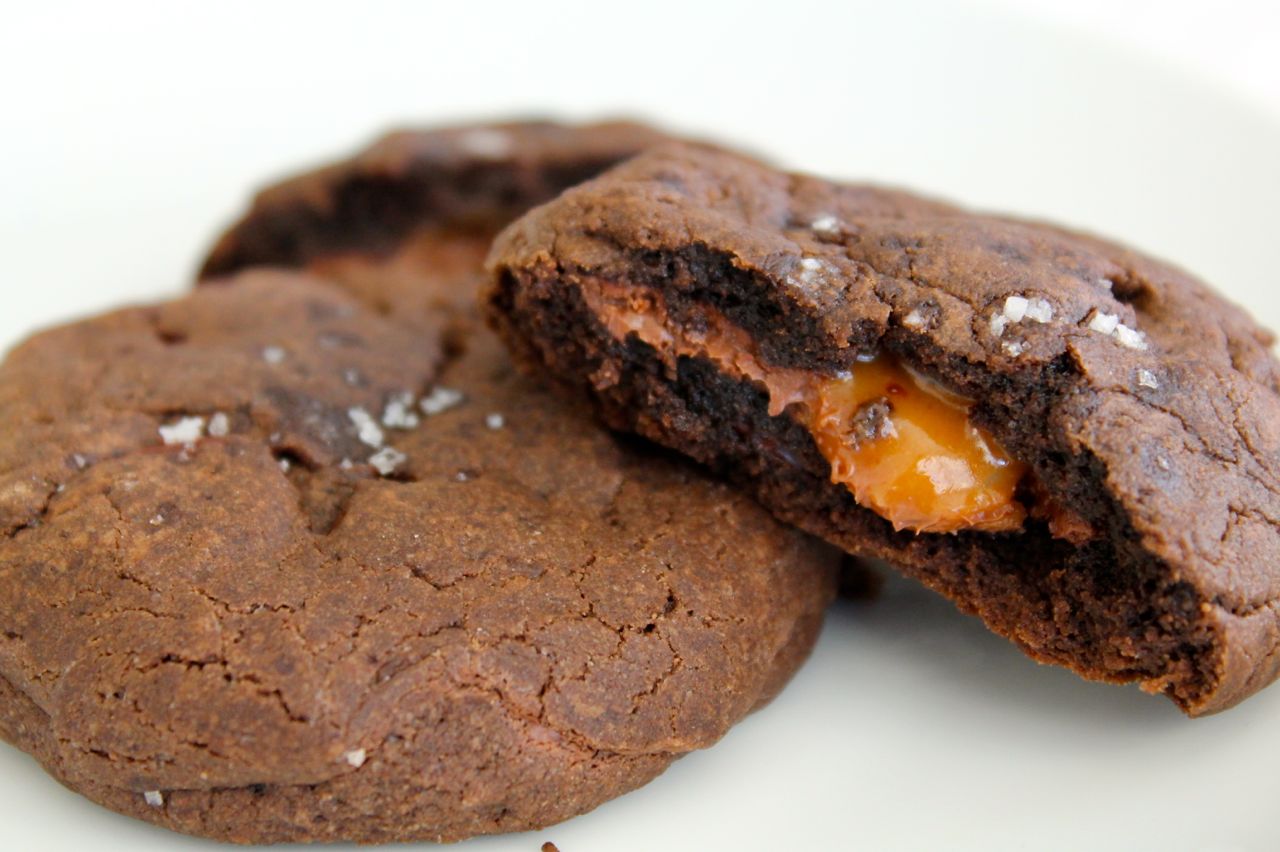
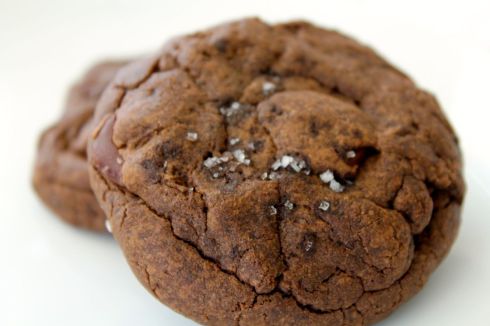
1) All the recipes for the Great Food Blogger Cookie Swap are live! There were 555 submissions of delicious holiday cookies. Check out the Recipe Roundup, part 1 and part 2.

2) Congrats to Elly on winning the Clinique giveaway!

Happy Christmas!

Sweet Potato Pie adapted from Joy the Baker

Crust:

1 1/2 cups flour
1/2 cup butter, melted and cooled to room temp
2 tablespoons cold milk
1 1/2 teaspoons white sugar
1 teaspoon salt

Filling:

2 cups mashed cooked sweet potatoes, from 2 medium sweet potatoes
1 cup + 4 teaspoons packed brown sugar, divided
1 teaspoon ground cloves
1/2 teaspoon nutmeg
1/2 teaspoon cinnamon
1/4 teaspoon salt
1/4 cup (2 ounces) unsalted butter
3/4 cup heavy cream
1/2 cup milk
3 eggs

For the crust: Mix together crust ingredients: flour, melted butter, milk, teaspoons sugar, and salt. Blend evenly. Spread mixture into a 9″ pie pan, pushing dough evenly across the bottom and up the sides.

For the filling:

Peel the sweet potatoes and dice into small 1/2″ chunks. Place potato pieces in a large pot and cover with water. Bring to a boil over medium high heat. Reduce heat to medium, and simmer until potatoes are tender throughout, about 20 minutes. Test the doneness of the potatoes using a knife. If the knife meets any resistance, simmer the potatoes a bit longer. Once finished, drain into a colander.

Preheat the oven to 350 F.

In the same large pot place cooked  potato pieces, half the packed brown sugar, all of the spices, salt, butter, and heavy cream. Cook on low, using a potato masher to mash the potatoes as they cook. Simmer for about 5 minutes. Make sure that the mixture is as smooth as possible. Once mixture is smooth and fragrant, remove from fire and let cool in pot.

In a medium bowl, whisk together the milk, the rest of the brown sugar, eggs, and vanilla extract. Whisk well. Pour the egg mixture into the warm sweet potato mixture.

Pour the prepared filling into the pie crust. Place on a baking sheet and bake until cooked through, about 45 to 50 minutes.

To test the pie for doneness, lightly shake the baking sheet. If the center of the pie has a wavy jiggle, it needs more time in the oven. If the center of the pie has a lighter, more structured jiggle, it’s done!

IMG_2987

Linking Up With:

Funday Monday from Still Being Molly
Block Party from Sumo’s Sweet Stuff
Inspiration Monday from Twelve O Eight

Advertisement

Salted Nutella- & Caramel-Stuffed Chocolate Chocolate Chip Cookies

11 Dec

Whoa! That title is a mouthful. And so are these cookies.

IMG_2963

In case you couldn’t tell from the name, these cookies are delightfully (and maybe a little sinfully) decadent. But when I was considering options for the Great Food Blogger Cookie Swap of 2013, I knew I needed something big. And since I went with something a little more mature and restrained last year — Chinese Chai Cookies — I decided to go all out. 2013 seemed to call for it.

Oh hai there little choco chip

As you can imagine, Salted Nutella- & Caramel-Stuffed Chocolate Chocolate Chip Cookies were a bit of a project, but they were worth it. And after I called in reinforcements — my BFF Lauren, aka Betsy Bundt — it really wasn’t too difficult with two people.

As an expert caramel-maker, Lauren took on that project while I whipped up the cookie dough. Once they were both ready, I rolled out balls of dough and pressed them out, Lauren filled them with a bit of caramel and a dab of Nutella, and I rolled out a second cookie disc to press on top and sandwich it all together. The cookie assembling took quite a while, so I finished up that while Lauren managed the multiple batches of cookies going in and out of the oven. See? Teamwork!

IMG_2968

I highly recommend eating these right out of the oven. They’re even gooier and richer and decadent-er. Plus, once they cool, the caramel is a little too tough. In the unlikely scenario that you can’t manage to enjoy the entire batch fresh from the oven and you have a few cookies leftover, just heat them in the microwave for 15-20 seconds before eating so the caramel gets all gooey again.

After I let all the cookies cool down, I packaged them up in adorable little gift boxes and sent them off to my 3 matches from the Great Food Blogger Cookie Swap!

photo 1\photo 3

Before I launch into the recipe for these delectable treats, a couple updates…

1) Today’s the last day to enter my first-ever giveaway! Check it out in last week’s post.

photo (9)

2) Wine & Plum now has an Etsy shop! Right now there’s hand-knit scarves, like the eco-friendly wine and plum scarf pictured here, and creaseless hair elastics. In the next few days I’ll add new jewelry items as well. Order soon and receive your items just in time for Christmas gifts!

scarf

And now the recipe!

Salted Nutella- & Caramel-Stuffed Chocolate Chocolate Chip Cookies from Top With Cinnamon

1/2 cup butter
1 1/2 cups brown sugar
1/2 cup cocoa powder (I used half regular and half extra dark cocoa powder)
2 eggs
1/4 tsp salt
3/4 tsp baking powder
2 cups all-purpose flour
1/2 cup dark chocolate chips
fleur de sel, for sprinkling
approx. 1/2 cup (8 tbsp) nutella
1 recipe for Salted caramel OR 15-16 caramel-filled chocolates
Line a baking tray with parchment paper. Preheat your oven to 350 degrees F.

In a medium saucepan, melt the butter. Take off the heat and stir in the brown sugar and eggs. Then add the cocoa, salt, and baking powder. Stir until well combined. Add the flour and stir until well combined. Fold in chocolate chips.

Make the caramel, if using (follow link for recipe).

Take 1 heaped tbsp of dough and roll into a fat disc shape. Use your finger make a large indentation the centre of the dough; fill the indentation with a small blob of nutella (like 1/4 tsp ish), and top it up with the still-warm salted caramel (or a caramel-filled chocolate). Top with a flattened tablespoon of dough, and seal the edges. (You may need to dab on a little extra dough to seal the edges.)

Sprinkle with fleur de sel, and bake for 8-10 minutes.

Yield: 15-18 cookies.

IMG_2956

Linking Up With:

Funday Monday from Still Being Molly
Block Party from Sumo’s Sweet Stuff
Made by you Monday from Skip to my Lou
Inspiration Monday from Twelve O Eight
Time to Sparkle from Love Grows Wild
Wonderful Food Wednesday from All She Cooks
Create It Thursday from Lamberts Lately
Full Plate Thursday from Miz Helen’s Country Cottage
All Things Pretty from Sparkles and a Stove

Apple Cinnamon Baked Oatmeal

3 Dec

Whew! I am exhausted. Last night was our huge annual fundraiser at work — our Holiday Auction. As the fundraising person, I’m in charge of planning and executing the whole thing. With 250 people, 250 items, dinner, and more, it’s quite a task. With mostly 10- and 12-hour workdays for the past couple weeks, let’s just say that things at home have been a little… neglected.

My closet is about two feet deep in clothes and random detritus right now. (I wish I were exaggerating.) The dirty clothes basket has been re-appropriated to serve as a second clean clothes basket, with those and another load in the dryer waiting to be folded and put away. The kitchen and fridge are full of take-out boxes that need to be thrown away and the trash taken out. And I think the BF misses me, since I’ve mostly been working or sleeping.

So… hello, December! The month for me to get back into the swing of things. I’m planning on doing a little less working, which will leave a more time for other verbs, like celebrating, relaxing, cooking, cleaning, and yoga-ing. And with the holidays coming up, I’m of course looking forward to baking. I’m already brainstorming what I can make!

One thing I’ve decided: I’m definitely making this apple cinnamon baked oatmeal for Christmas morning. In hindsight, since I’ve eaten take-out and fast food at my desk for the majority of my meals the past two weeks, I really wish I had made up a batch of this last weekend to munch throughout the week.

Baked Apple Cinnamon Oatmeal

This baked oatmeal is amazing. I’m not a big fan of goopy, thick oatmeal — the texture grosses me out. So instant, microwaveable oatmeal really isn’t for me. But this bakes into a more cake-like texture, a little more solid. Much more my speed. And the apples are the best part — cooked in cinnamon sugar before baking, they are so sweet and delicious. But the oatmeal is pretty healthy, so overall, is comes out to a pretty balanced breakfast.

The best part? It’s just as delicious re-heated. So you can bake some up on the weekend and then have breakfast ready for those busy work mornings. Or… I can bake some up a couple days early, and then warm it in the oven on Christmas morning. Mmm… I’m already looking forward to it.

Mmm... Breakfast!


Apple Cinnamon Baked Oatmeal
adapted from Two Peas & Their Pod and Annie’s Eats

For the cooked apples:
2 tbsp. unsalted butter
5 small or 3 large apples, peeled and diced into small 1/4″ pieces
1 teaspoon cinnamon
2 tablespoons brown sugar

For the oatmeal:
2 cups old fashioned oats
1/4 cup light brown sugar
2 teaspoons cinnamon
1 teaspoon baking powder
1/4 teaspoon salt
1 cup whole milk*
1/2 cup skim milk*
1/2 cup cinnamon applesauce
1 tablespoon melted butter
2 egg whites
1 teaspoon vanilla

Preheat oven to 350 degrees F. Coat an 8 by 8 baking dish with cooking spray and set aside.

In a skillet over medium heat, cook the apples with 2 tablespoons butter, 1 teaspoon cinnamon, and 2 tablespoons brown sugar for about 15 min or until soft. Layer in bottom of greased pan and set aside.

In a large bowl, combine oats, brown sugar, cinnamon, baking powder, and salt. Set aside.

In a medium bowl, whisk together milk, applesauce, butter, egg whites, and vanilla. Pour wet ingredients over dry ingredients and stir until combined. Pour oatmeal mixture over top apples.

Bake for 20 minutes or until oatmeal is golden brown and set. Remove from oven and serve warm. Add additional toppings to baked oatmeal, if desired.

* You can use any milk you want to reach 1 1/2 cups total. I used a mix of the two since that’s what I had in the fridge. You could use skim, 1%, 2%, whole, or any mix of those. I’d imagine soy or rice alternatives would also be successful, but I don’t know for sure. If you try those, let me know how it goes!

Linking up for:
YOLO Mondays from Still Being Molly and Lipgloss and Crayons
Monday Meet Ups from Covered in Grace
Made by you Monday from Skip to my Lou
Linky Party with Fine Craft Guild

Rudolph Cupcakes

29 Dec

Breakaway cupcakes are all the rage these days, so here’s some Christmas-y ones for you. My cousin and one of my sisters made these, so I don’t have a recipe, but you don’t really need one.

They used yellow cake mix for all the cupcakes, baking them in red and green paper liners. For the face, they spread on canned chocolate icing. And for the antlers, they piped on canned vanilla icing in wide zig-zag lines. They added graham cracker crumbs on top of the antlers.

Rudolph Cupcakes

For the facial features: the eyes are two Double-Stuf Oreos painted with chocolate and white icing. The nose is another Double-Stuf Oreo painted with red icing. The mouth is black gel icing.

And that’s it! Super cute, and very festive!

Rudolph Cupcakes!

Merry Christmas!

Spice Cupcakes with Cream Cheese Icing

26 Dec

I recently made cupcakes for our Navidad Nacho Noche — our annual Christmas celebration over a nacho dinner with Betsy and a couple other friends. Betsy’s bf requested non-chocolate cupcakes, and in the spirit of Christmas, I decided a spice cake would be great, topped with – what else? – cream cheese icing.

For the cupcakes, I used the hand mixer to cream together 10 tablespoons of butter and 1 cup of packed brown sugar. I added 3 eggs one at a time and beat well after each one.

Ingredients

In another bowl, I whisked to combine the dry ingredients: 1 3/4 cups of all-purpose flour, 1 1/2 teaspoons of baking powder, 1/2 teaspoon of baking soda, 1 1/2 teaspoons of cinnamon, 1/2 teaspoon of ginger, 1/4 teaspoon of ground nutmeg, and 1/4 teaspoon of salt.

Batter

While mixing with the hand mixer, I alternated adding the dry ingredients and 3/4 cup of sour cream. I filled a dozen paper-lined cupcake pan cups. I added some chopped walnuts to the leftover batter and filled another cupcake pan – about 5 more cupcakes. (Some people in my group don’t like nuts, ahem ahem, Betsy.) If you want nuts in all your cupcakes, I’d suggest 1/4 cup of finely chopped nuts of your choice.

Cupcake BatterBaking Cupcakes in the Oven

I baked the cupcakes at 350 F for about 15 minutes — the toothpick I inserted came out clean.

Testing the Cupcakes

Cooling CupcakesI cooled them overnight and frosted them with cream cheese icing the next day.

Spice Cupcakes

How Sue Sees It:
– My friends said they really liked these, but I don’t know if they were just being nice. I actually didn’t like them very much. They were not very sweet, and I have something of a sweet tooth. The cream cheese icing was MUCH sweeter than the cupcake, so that made them worthwhile for me. If you like your desserts a little less sweet, you’ll probably like these. Though once I decided I could call them muffins and have them for breakfast, I liked them better.
– The cupcakes with nuts in them looked better than the ones without. They rose a little higher, while the nut-less cupcakes were flat and smooth on top. Weird.

Snowflake Cookies

16 Dec

It has been unusually cold in North Carolina, with temperatures in the 30s and snowfall in early December! Very strange, but also a perfect setting for these gorgeous snowflake sugar cookies.

Of course, after my notorious Cookie Fail, I relied heavily on Betsy’s cookie expertise for this batch of cookies. We started with a basic sugar cookie recipe.

After a lot of practice, we got in a good rhythm: Betsy is good at rolling and cutting, and I’m good peeling and placing on the pan. I usually am not big on purchasing specific kitchen tools that do fancy things because I think most baking can be accomplished with basic kitchen items, but I will say that the large spreader from Pampered Chef came in handy. It’s designed to be used to spread icing on large cakes, but it worked really well to slide delicate snowflake shapes off the counter top and get them to the baking pan. Just flour it a little and it works like a charm.

Sugar Snowflake Cookies
After baking and cooling about 6 dozen cookies (yes, it took forever), I set about with decorating (which took another forever).

We whipped up a batch of royal icing and added some whitening cream to make it extra-white, instead of kind of a dull, unappealing cream color. Betsy loaded it into an icing bag with a tiny tip for me, and I got to work. Royal icing hardens into a solid layer when it comes in contact with air. It takes a few hours for it to harden completely, but it gets difficult to spread evenly within minutes. So working relatively quickly, I did one cookie at a time. To make sure I got a neat overall cover, I first traced the snowflake outline and then filled it in. I held it still with a wooden skewer so I could move a little more quickly. Then, using a pair of tweezers, I added light blue sugar pearls. Play around with different patterns and get creative — it’s fun!

Tracing a snowflake outlineFilling in with icingAdding the pearl decorations

I made two different patterns with the white icing. Then we made another batch of royal icing and colored it with light blue dye and a little bit of whitening to lighten it to the right shade. I decorated another 2 dozen cookies with the same patterns as the white cookies, but with light blue icing and white sugar pearls.

While I worked on those, Betsy decorated the rest of the cookies with sugar sprinkles. For a dozen cookies, she used a paintbrush to coat each cookie with a layer of piping gel, which only looks disgusting. Then she poured silver pearlized sugar on top, and that’s it! Quite simple.

For another dozen cookies, we wanted them to be blue, but the blue pearlized sugar was way to bold next to the light blue royal icing. So Betsy mixed a little blue food coloring into the piping gel and then decorated it the same way — paint it on the cookie and then cover with silver sprinkles. It gave a very pale blue shine, almost like glass, underneath the silver sprinkles. Very subtle and beautiful!

After the white cookies hardened completely, Betsy used a large paintbrush (you could also use a blush brush or kabuki makeup brush) to dust on some silver pearl dust. It’s like using glitter makeup with a slight sparkle to it — it’s barely noticeable but adds a nice little sparkling sheen to the cookie.

Snowflake Cookies

So this was a relatively short post compared to the others, but don’t think this is a relatively short process. Cutting cookies takes longer than filling a bunch of cake or cupcake tins, and decorating cookies like this — especially with a complicated cookie shape — takes a long time. All in all, this took us about 6 or 7 hours. And that doesn’t count the packaging and presentation time.

When I got home, I loaded 6 cookies — one of each decoration type — into clear plastic bags I picked up at Michael’s, twisted the top closed, secured it with tape, and tied it with a blue ribbon. They made adorable gift bags!

Snowflake CookiesSnowflake Cookies