Archive | Meat & Fish RSS feed for this section

Easy Shrimp & Green Bean Stir Fry

3 Feb

I rarely eat seafood, and I even more rarely cook it myself. But I was inspired the other night to try something new, so I stopped by Whole Foods and picked up some shrimp. And after reading the grossly-named but helpful book Gutbliss, I have been making efforts toward “clean eating.” According to the book, this means no dairy, gluten, sugar, artificial sweetener, soy, or alcohol. I did a 10-day cleanse and since then have been at least trying to consider clean food for a good portion of my meals. (It’s really hard for me to keep away from cheese and chocolate though!)

All this to say that in searching for a recipe for dinner, I wanted something that fit the bill for both clean eating and a quick weeknight meal. I’ve found that Asian-inspired stir fries are the best bet here.

stir fry 1

The BF and I both enjoyed this stir fry and agreed we should add it to our weeknight repertoire. It was not extremely flavorful, though I’m sure if you wanted it to be more so, you could easily add more garlic, ginger, and/or oyster/fish sauce. But I personally liked that there was enough of those flavors to be noticeable but not so much that you couldn’t still taste the natural flavor of the shrimp and vegetables.

Stir fries are the best because they’re so easily customizable, so if you’d rather have all broccoli and no green beans, or if you want to leave out the ginger, then just do your thing, you know?

FYI, this recipe made about 3 large portions for us — one dinner for the two of us and one leftover lunch portion for me.

IMG_3070

Easy Shrimp & Green Bean Stir Fry adapted from Food & Wine

2 tablespoons vegetable oil
3 garlic cloves, minced
1″ piece of ginger, peeled and minced
1 green onion, chopped small
1/2 pound shrimp
1/2 pound green beans
1/2 head of broccoli, chopped
1/4 cup chicken or vegetable stock
1 tablespoon oyster sauce
Salt & pepper to taste

Chop vegetables and prepare all ingredients before you begin cooking.

Heat a saute pan until very hot. Add the vegetable oil, and heat until shimmering. Add the garlic and stir-fry for 10 seconds.

Add the shrimp and a pinch of salt. Stir-fry until the shrimp are just beginning to turn pink, about 30 seconds. Add the green beans and 2 tablespoons of the stock and stir-fry until the beans soften slightly, about 3 minutes.

Add the remaining 2 tablespoons of stock along with the oyster sauce and a generous pinch of pepper. Stir-fry until the shrimp are cooked through and the beans are crisp-tender, about 3 more minutes. Serve immediately.

IMG_3073

Linking Up With:

Funday Monday from Still Being Molly
Made by you Monday from Skip to my Lou
Inspiration Monday from Twelve O Eight
Time to Sparkle from Love Grows Wild
Wonderfully Creative Wednesday from All She Cooks
Create It Thursday from Lamberts Lately
Full Plate Thursday from Miz Helen’s Country Cottage
All Things Pretty from Sparkles and a Stove

Classic Potato Soup

4 Nov

I feel like all I’m posting lately are soups and desserts. But that’s pretty much all I’m cooking, so I guess that’s about right. I’m not sure how long my soup obsession will last — it’s a relatively new thing, so I’m not sure if it will stick around. And of course I’ve always been obsessed with chocolate and sweets, so that seems like a permanent thing.

At any rate, I wanted to share this one with you now because it is so tasty and warm and filling and comforting. So if the time change has got you down — and I know I’m pretty down when I get home from work and it’s already completely dark — then this is the soup for you. It’s delicious and super unhealthy and it will warm you from the inside out. And it’s definitely hearty enough to be a complete meal. Though maybe you could balance it out with a nice salad or something.

Typically I try to give you options for vegetarian/vegan alternatives, and I am usually inclined to take that route myself. And I guess here you could go with vegetable broth and facon if you so desire. But really, if I’m talking comfort food, I’m talking about real bacon. I highly recommend it.

Potato Soup

Potato Soup from The Pioneer Woman

2-3 slices bacon
1/2 onion, diced
2 carrots, diced
2 stalks celery, diced
4 whole small potatoes, peeled and diced
1/2 teaspoon salt
black pepper, to taste
1/2 teaspoon cajun spice mix
4 cups (free-range, organic, low sodium) chicken broth
1 1/2 tablespoons flour
1/2 cup milk
1/4 cup heavy cream
1/2 cup cheddar, grated

Cook bacon in a large soup pot over medium heat until bacon is crisp and fat is rendered. Remove the bacon from the pot and set it aside. Pour off most of the grease, but do not clean the pot.

Return the hot to medium-high heat. Add the onions, carrots, and celery. Stir and cook for 2 minutes or so, then add the diced potatoes. Cook for 5 minutes, seasoning with salt, pepper, and Cajun spice.

Pour in the broth and bring it to a gentle boil. Cook for about 10 minutes, until the potatoes are starting to get tender. In a small bowl, whisk together the flour and the milk, then pour into the soup and allow the soup to cook for another 5 minutes.

Remove about 2/3 of the soup, and blend in a blender or food processor until completely smooth. Pour it back into the soup pot and stir to combine. Stir in cream. Check for spices, salt, pepper, and temperature, adjusting as needed.

Serve in bowls garnished with grated cheese and crumbled bacon.

IMG_2718

Linking Up With:

Funday Monday from Still Being Molly
Block Party from Sumo’s Sweet Stuff
Made by you Monday from Skip to my Lou
Inspiration Monday from Twelve O Eight
Melt In Your Mouth Monday from Make Ahead Meals for Busy Moms
Time to Sparkle from Love Grows Wild
Wonderful Food Wednesday from All She Cooks
Create It Thursday from Lamberts Lately
Full Plate Thursday from Miz Helen’s Country Cottage
All Things Pretty from Sparkles and a Stove
Foodie Friday from Simple Living & Eating

ABC (Apple-Bacon-Cheddar) Sandwiches

16 Sep

OMG these sandwiches are so good. The BF and I have enjoyed them multiple times in the past few weeks, as we’ve tried to use up all the apples from the Apple Festival. This was actually the first apple recipe we made.

I’ve mentioned before how much I love grilled cheese. It’s a life-long love affair. Cheese is essentially a food group for me.

Cheesy & Appley

My favorite cheese sandwiches right now:

  • The BAM (Bacon, apple, mushroom + gruyere on sourdough) from Sandwhich, one of my favorite lunch spots in Chapel Hill.
  • The Orchard (apple, ham, cheddar, and rosemary on country white) from American Meltdown, my favorite grilled cheese food truck. The BF and I regularly track down the big orange truck in Durham and elsewhere around the Triangle.
  • The Guacamole Grilled Cheese I posted a couple months ago.
  • The ABC (apple, bacon, cheddar on country white), recipe below.

Served up on a super thick slice of country loaf from Bread & Butter and soaked in butter, this may not have been the most healthy dinner, but it sure was tasty. Need a grilled cheese fix? Try this out. You won’t regret it.

Here’s a recipe. I didn’t really use amounts because sandwiches are one of those things where you should just put however much you want to on the bread.

ABC... easy as 123

ABC Sandwich

2 slices of bread
thin slices of apple (Granny Smith if you like tart; Gala if you like sweet)
bacon slices
cheddar slices
butter

Slice everything up. Arrange slices of cheddar cheese on the surface of both slices of bread. Broil or toast until the cheese is melted and the bread is slightly crispy.

While the bread is toasting, fry up a couple slices of bacon in a skillet. When finished, rest bacon on a paper towel.

Melt 1/2 tablespoon butter in a pan over medium heat. Transfer a slice of cheesy bread to the pan, layer on the apple and bacon. Sandwich the other slice of cheesy bread on top. Flip the sandwich when the bread is golden brown, only a couple minutes on each side.

ABC with Sweet Potato Fries

Linking up With:

Funday Monday from Still Being Molly and Lipgloss and Crayons
Block Party from Sumo’s Sweet Stuff
Made by you Monday from Skip to my Lou
Time to Sparkle from Love Grows WildInside BruCrew LifeThe Recipe Critic, and The Gunny Sack
Create It Thursday from Lamberts Lately
All Things Pretty from Sparkles and a Stove and My Fashion Forward Blog

Stuffed Acorn Squash

5 Aug

This was so easy and so delish, I’m about to go out and find me some more acorn squash. The acorn made a terrific bowl that both held tasty fillings and also made for good eating. Like a tasty bread bowl for soup expect it doesn’t get soggy and mushy.

As we ate this for dinner last week, we brainstormed all the amazing ways we could prepare it. Italian style with sausage, tomatoes, mozzarella, and herbs. Greek style with lamb, tomatoes, olives, and feta. Mexican style with beef, tomatoes, cheese, and taco seasoning. There are loads of all-veggie options too.

Mmm cheesy goodness

This is such a versatile recipe. If you try it, you should definitely experiment and make it your own. Think up what flavors you’re in the mood for, and run with it. And if you don’t have a veggie on the ingredient list, no worries. Just leave it out or substitute it for something else. No big deal. It will still be delicious.

Better yet, prepare this on a night when you have guests over. The presentation is pretty amazing. They will think you’re a secret top chef.

This recipe was enough for the BF and me, but we’re pretty light eaters, so one half of a filled squash was enough for each of us. I’d recommend getting two squashes and doubling the recipe.

For me, the key to this recipe is to chop everything really small — that way, you can cram more into your squash bowl.

Beautiful Squash

Stuffed Acorn Squash adapted from TheKitchn

1 medium acorn squash
1 tablespoon olive oil
1 clove garlic, minced
1/4 bell pepper, chopped small
handful cherry tomatoes, chopped small
1 large sausage link or vegetarian substitute, diced small (I used sweet apple chicken sausage)
1/2 teaspoon French or Italian herb mix
1/2 teaspoon red pepper flakes
1 cup baby spinach
Salt and pepper as needed
Bread crumbs (I used crushed-up seasoned croutons — they gave a little extra flavor!)
1/4 cup parmesan, finely grated

Wash the squash and halve it. Scrape the insides and seeds out of the squash. Place the squash in a shallow dish with about half an inch of water. Microwave on high for 7-10 minutes or until tender. Leave in microwave until ready to use.

Heat the olive oil in a large saute pan over medium heat. Add the garlic, bell pepper, tomatoes, and sausage. If using uncooked sausage, cook until sausage is almost cooked through. If using pre-cooked sausage, cook until the garlic starts to smell.

Add the spices and stir well. Add the spinach and cook, covered, until wilted. Add salt and pepper as needed. Remove from heat.

Place squash halves on a lightly greased baking sheet. Spoon the filling into squash halves, and sprinkle with salt and pepper. Add one tablespoon of water to each squash. Coat the filled squash with breadcrumbs. Sprinkle with a thick layer of grated cheese. Broil just until cheese is lightly browned.

Dig In!

Linking Up With:

Funday Monday from Still Being Molly and Lipgloss and Crayons
Market Yourself Monday from Sumo’s Sweet Stuff
Made by you Monday from Skip to my Lou
Time to Sparkle from Love Grows WildInside BruCrew LifeThe Recipe Critic, and The Gunny Sack
Link Party Wednesday from Lil’ Luna
Create It Thursday from Lamberts Lately
All Things Pretty from Sparkles and a Stove and My Fashion Forward Blog

Beef Empanadas and Black Bean & Corn Empanadas

4 Mar

My BFF Lauren came over to help me with this project. Because I was certain it would turn out to be a project. My goal was to make empanadas from scratch to share with my book club on the evening we discussed Daughter of Fortune by Isabel Allende. These Chilean empanadas — along with delicious alfajores — seemed to fit the theme of the book perfectly.

I put a few different recipes together to come up with scratch-made dough, a beef-based filling, and a black bean filling. The beef version is the traditional Chilean version, but I also wanted a vegetarian option.

Pretty easy concept here, just a lot of work. Mix up the fillings and set them aside. Make up the dough and roll it out, then cut circles.

Roll out the dough

Fill with the beef filling…

Beef filling

Or the bean filling.

Black bean & corn filling

Seal up the empanadas. We used a ravioli kit, and it worked really well.

Sealed empanadas

Place them on the baking tray and coat with an egg wash.

Egg wash

Bake to golden perfection.

Golden empanadas

Overall, I thought these were decent, but not necessarily my fave. The dough is a little thick and hard. I would have preferred a softer dough, more like biscuit or pie dough — I should maybe have used shortening or the traditional option: lard. As for the fillings, the beef is too onion-y — though from what I’ve read, that’s probably more a Chilean thing than the fault of this recipe. And I can’t really put my finger on it, but the bean filling was a little weird. I left out cheese from the fillings, thinking it would be better to offer dairy-free options to guests. But I served them with some queso, salsa, and guacamole, so that worked out well in the end.

So I’m aware I’m not really selling this too well. You should try this though! I do think that my opinion of this is mostly just an issue of personal preference. The recipes themselves aren’t bad. I froze the leftovers. Thawing one or two at a time to have with a bowl of soup made for a great lunch.

Chilean Empanadas

Dough

Here’s the thing — I can’t find the recipe I used. But maybe that’s not the end of the world, considering I didn’t like it all that much. I’d recommend Martha Stewart’s empanada dough recipe, just because I usually have good luck with her stuff, or do what one site suggested and just use refrigerated biscuit dough.

If you make you own dough, divide it into two sections and refrigerate it so it’s not too soft for rolling.

Beef Filling

1 onion, diced
2 Tablespoons vegetable oil
½ lb ground meat
1 teaspoon chili powder
1 teaspoon cumin
½ teaspoon oregano
Salt to taste
½ teaspoon black pepper

Heat the oil in a pan over medium heat. Add onion and cook 2-3 minutes until onion is translucent. Add meat and blend together.

Add salt, pepper, and spices, and continue mixing over heat until meat is browned. Remove from heat and let cool.

Black Bean & Corn Filling

1 small onion, diced
3 tablespoons vegetable oil
1/2 teaspoon garlic salt
1 teaspoon cumin
1 medium tomato, seeded and diced
1 tablespoon sugar
1 (15.5 ounce) can black beans, drained
2 cups frozen corn kernels
Juice of 1/2 lime
1/2 cup raisins

Heat the oil in a pan over medium heat. Add the chopped onions, cumin, and garlic salt, and sauté until the onions are soft and translucent, about 5-8 minutes.

Add the chopped tomatoes, black beans, and sugar. Saute, stirring, for about 5 minutes more, or until excess liquid has cooked away and tomatoes are beginning to stick to the pan.

Add the corn, raisins, and lime juice, and cook for five minutes more.

Remove mixture from heat and scrape into a heat proof bowl. Let cool to room temperature, then chill for at least one hour.

Assembly

raisins (optional)
olives, diced (optional)
hard-boiled eggs, sliced (optional)
1 raw egg, scrambled

Roll your dough out to about 1/4″ thickness. Cut into circles.

Fill your circles with a spoonful or two of the filling. If desired, add a few raisins and/or olive slices on top of the filling.

Fold in half and press the edges shut. If necessary, wet your finger and run it along the sides to seal the edges shut.

(I used a ravioli kit to cut the circles and then press the edges shut. You can easily do this on your own without a kit.)

Heat oven to 375 degrees. Place each empanada on a baking sheet and use a fork to poke a few holes in the top to prevent oven explosions. (I poked the bean & cheese ones horizontally and the beef ones vertically so they would be distinguishable when served.)

Scramble the egg in a bowl. Brush a light egg wash coating on each empanada.

Bake for 20-30 minutes or until empanadas are a golden brown color.

Empanadas

Linking up with:

YOLO Mondays from Still Being Molly and Lipgloss and Crayons
Monday Meet Ups from Covered in Grace
Market Yourself Monday from Sumo’s Sweet Stuff
Your Great Idea Link Party from Or So She Says
Time for a Party from Fine Craft Guild
Made by you Monday from Skip to my Lou

Slow Cooker Sausage & Peppers

28 Jan

This past weekend I helped with the decorations and planning for my future sister-in-law’s bridal shower. I had a lot of fun doing the decorations, and I’m going to be crafting even more for the wedding in April. I will definitely share some of the projects at some point, though I’m making no promises on the timeline.

For the shower, we did a potluck, and everyone brought very delicious food. I’ll share a few recipes as I get them. This one’s short and simple, from my momma. She made a delicious sausage dish. It works equally well on a potluck table as it does for a main meal. When we walked in to set up the decorations, I could smell it cooking in her crockpot.

I was about to say “delicious and warm for a wintery night!” But I remember having simple dishes like this in the summertime, when we were off from school and too busy doing fun things to cook. Sausage and fruit salad and chips were a great summer meal when I was growing up. So I guess… it’s good all year round!

Slow Cooker Sausage & Peppers

Sausage and Peppers
1 pound sweet Italian sausage links
1 large onion, sliced
2 red bell peppers, sliced
1 small can diced tomatoes
Cut sausage into bite size pieces and brown in a skillet. Combine everything in a slow cooker and cook on low for 4-6 hours or high for 2-3 hours.

 
Linking up with:

Pineapple Porkchops + Being in the Moment

31 Dec

My thoughts are all over the place. I planned on talking about Christmas and the New Year and all sorts of big, exciting things. But I spent last night waking up screaming from a series of nightmares, and it’s got me all jumbled. The BF is also a little jumbled after being jolted awake by my screams. Way to send 2012 out with a bang, right?

I went back to yoga yesterday after a long three-month hiatus. After a billion chatarangas and a few too long utkatasanas (a.k.a. chair pose, a.k.a. my misery), I was zoning out in child’s pose when our instructor started talking about being in the moment. She had a New Year’s theme, talking about how we make resolutions and spend too much time indulging today with the plan to work out tomorrow. And while an occasional indulgence is no problem — of that I’m a firm believer — it’s still important to be in the moment and be intentional. Stop making plans and just do it, you know?

I thought that was a great lesson, but what really had me thinking this morning was her comment to ‘be in the moment and stop planning.’ Bear with me as I pull all this wandering back together.  I remember having a few nightmares when I was a kid, but they really started in earnest about halfway through college. I realized that any stress I try to ignore during waking hours pop up as nightmares in my sleep. (Denial has long been my strongest defense mechanism.) So after a nightmare, I talk it out, trying to cope with whatever stress triggered it, rationalizing the nightmare away. This works great… when the nightmare is triggered by some specific stress.

I spent today’s early morning hours trying to figure out what triggered last night’s bad dreams, and I couldn’t come up with anything. I want to find something so I can deal with it and banish it, but I can’t. And it had me realizing that sometimes, plans don’t work. My standard coping plan isn’t cutting it. So instead I just let it be. I had a couple nightmares, I can’t explain it, it is what it is. I just laid in bed for a few minutes, letting the fear subside and my heart stop pounding while the BF held me, and then I told him about the dreams. Then I got up and made myself a cup of tea and started along my day. There’s nothing else to figure out. No matter how I plan or rationalize, I had some nightmares, and I will have more. Instead of worrying about it, I’ll accept that, and just be.

Now, I don’t know if I can ever stop planning. Most of my control issues manifest in planning everything and needing to know what’s going to happen next. But even if I can’t stop planning, I can at least try to be in the moment and be intentional.

So right now I’m in this moment — a cup of tea, the fire going in the living room, and this here blog. Then I’ll spend the day focusing on my moments as a cook up a bunch of freezer meals to last the next few weeks.

Yes, I just planned to be in the moment. So sue me.

And since I feel like I should share something aside from my personal issues, I’ll go ahead and throw in this recipe for Pineapple Porkchops. The BF made it for dinner the other day. I was quite impressed — it was pretty tasty.

Pineapple Porkchops

One-Skillet Pineapple Porkchops, adapted from Eating Well

3 Tablespoons apricot jam (or pineapple jam or orange marmalade)
1/2 cup+ pineapple-orange juice, divided*
1/2 teaspoon ground ginger
1/2 teaspoon curry powder
4 fresh (or canned) pineapple rings, cut 1/4″thick
2 teaspoons butter
4 boneless pork chops, trimmed
1/2 teaspoon thyme
1/2 teaspoon salt
1/2 teaspoon pepper

Combine jam, 3 tablespoons orange juice, ginger, and curry powder in a small bowl; set sauce aside.

Measure 1/3 cup pineapple-orange juice into a measuring cup and set juice aside.

Heat butter in a cast-iron skillet over medium-high heat. Add pork and sprinkle with thyme, salt, and pepper. Immediately turn them and sprinkle the other side as well. Cook the pork until browned, turning occasionally, about 3-4 minutes.

Add the reserved juice to the pan. Reduce heat to medium and continue cooking until pork is cooked through, 2-3 more minutes. Transfer to plates or platter and keep warm.

To the hot pan, add the pineapple slices, reserved sauce, and a little more thyme. Cook until hot and bubbling, stirring constantly, about 1-2 minutes. Spoon the sauce onto the chops and pineapple. Serve with rice.

* Use any combination of orange juice, pineapple juice, or similar juice to reach the necessary amount. If you use canned pineapple, you can use the juice from the can and top it off with orange juice. We used pineapple-strawberry-orange juice, because that’s what we had in the fridge.

Linking up for:

Free Dinner!

14 Mar

This isn’t a nice recipe or anything, but I was just super impressed with my own economical dinner skills tonight and thought I’d share.

I got home late from a meeting, the BF is still out, and I was starving. I was doing my typical stand-in-front-of-the-open-fridge-and-hope-something-tasty-magically-appears. And in my head, I heard my dad yelling, “Shut the door!” (Everyone’s dad yells that, right?) But then something magically did appear: an idea. (Oh so cheesy, I know. Apologies.)

From the top shelf: Leftover bhindi (okra) masala from going out to Tandoor Indian last night (Yum!). The BF already ate the chicken tikka masala, so there wasn’t enough left for a meal.

From the way back of the middle shelf: Leftover brown rice from last weekend’s salmon lunch.

From the bottom shelf: Leftover baked chicken a friend sent home with the BF when I couldn’t make it to dinner this weekend.

From the drawer: Leftover asparagus spears, also from the salmon lunch.

Each on its own, certainly not enough for a meal. But together – perfect! I just finished, and it was delicious, easy, and free. Yay for no waste!

Leftovers Dinner

And for dessert… coconut chocolate chip oatmeal cookies leftover from a visit to a friend this weekend!

C is for Cookie!

Herbed Salmon with Asparagus and Brown Rice

11 Mar

We just made a super delicious Sunday lunch. Pretty fancy, but it wasn’t much work. This would make a great meal for dinner guests.

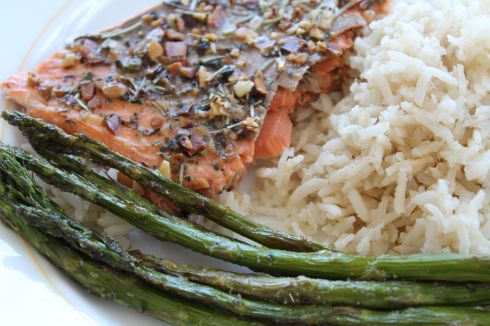
We got a frozen salmon fillet from Trader Joe’s and thawed it out. The BF laid it on a baking sheet while I put together the herb blend. I was going for a similar idea as the Herb-Crusted Pork I posted a while back. In a small bowl, I mixed up some toasted chopped almondsdried rosemarydried thyme, and some sage. (Sorry I don’t have exact measurements here, I was just making it up as I went.) I added enough olive oil to give it a somewhat paste-like consistency. Then I spread it evenly on top of the fish. If it looks like it’s not enough, just make a little more.

Fish Close-Up

I set the whole pan in the fridge until we were ready for lunch. Then the BF popped it in the oven, and we baked it on 400 F for about 12-15 minutes. He covered it in foil while it baked so it would stay moist. If you like it flakier, you may opt to go without the foil, or to take the foil off in the last few minutes.

He also prepared a tray of asparagus seasoned with a lemon and garlic spice blend, and baked it right alongside the fish. That’s what made it so easy – they baked at the same temperature for the same amount of time, so only one thing to keep track of.

Asparagus

We served our fish and asparagus with brown rice. A delicious and healthy meal. Lunch is served!

Lunch

Blueberry Burgers with Nectarine Salsa

3 Jul

Sounds weird, huh? I thought so. And honestly, they’ve got blueberries in them — of course they taste a little weird. But weird isn’t always bad. Weird can be good. Like keytars. And blueberry burgers. These don’t taste like normal burgers, but they do taste good. I prepared them two ways, so you can take your pick. There’s 3 different recipes in this 1 post — get excited.


Blueberry Quinoa Burgers

Quinoa (pronounced keen-wah) is actually a seed, but it’s used more like a grain. It’s also super duper healthy, so hipsters love the stuff. It’s a complete protein source, which is unusual for plants, so it’s a great staple in a vegetarian diet. It’s also high in fiber and amino acids. You cook is basically like rice, and it reminds me a lot of couscous.

I thought a veggie burger would be great with blueberries, and I decided to use quinoa to give it that extra protein that is sometimes lacking in vegetarian meals. I started the burgers by cooking the quinoa: I boiled 3/4 cup water and then added 1/2 cup quinoa. I cooked it until the water was absorbed, about 12-14 minutes, and set it aside.

Quinoa

I set up my food processor and added in the burger ingredients: 1 can great northern beans (drained and rinsed), 1/3 cup panko breadcrumbs (if you use regular breadcrumbs instead, use about 1/4 cup), 1 egg, 1/3 cup fresh blueberries, 1 T apple cider vinegar, 1 tsp dijon mustard, 1 tsp oyster sauce, 2 cloves minced garlic, a dash of salt, and a  dash of pepper

Quinoa Burger IngredientsI pulsed everything until it was combined but still a little chunky. I divided the mixture into four and formed four patties. They were a little soft and mushy, so I put them on a parchment-lined cookie sheet and refrigerated them until I was ready to cook them. (At this point, I prepared the other burgers, but I’ll continue with this recipe for the sake of clarity.)

Quinoa Patty

In a large skillet, I heated some olive oil over medium heat. I cooked the blueberry quinoa burgers until browned, about 8-10 minutes per side.

You can dress up your burger however you like, but I added spinach and mozarella to my burger and served it with a side of chips.

Blueberry Quinoa Burger


Blueberry Burger

I wiped out my food processor and started over with the meat burgers. I put two slices of bread in the food processor, processed it to crumbs, and set that aside.

Next, I put the ingredients in the food processor: 1/3 cup fresh blueberries, 1 T apple cider vinegar, 1 tsp Dijon mustard,  1 tsp oyster sauce, 2 cloves minced garlic, a dash of salt, and a dash of pepper. I processed it until it was pureed and then dumped it all into the bowl with the breadcrumbs. I added 1/2 pound ground meat (I used turkey, but you could use beef or whatever you prefer) and mixed everything together. I didn’t have a potato masher, so I used the mixing attachment from my hand mixer. 

Turkey Burger IngredientsOnce it was all mixed up, I divided it into 4 portions and shaped them into patties. I sent the BF out to the electric grill with them, and he grilled them over medium-low heat until done, about 7-8 minutes per side.

Meat Patty

Again, you can dress up your burgers however you like. I added a scoop of nectarine salsa on this one and served it with tortilla chips and more salsa.

Blueberry Burger with Nectarine Salsa


Nectarine Salsa

Honestly, this may have been the best part of the entire meal. I thought it was so good. If peaches are in better shape when you go to the store, by all means, use them instead. I went with nectarines because they were a little more ripe.

First I chopped everything up — not too finely since they go for a stint in the food processor, but just enough for the processor to find them manageable. I used 2 ripe (but firm) nectarines with the skin on, 1 shallot,  and 1 jalapeno (I threw out the stems, seeds, and ribs, which are the spiciest parts).

After I got those chopped up and put in the food processor, I added in the juice of half a lemon, 1 T grated ginger, 1 tsp sugar, a dash of salt, and a dash of pepper. I pulsed it just a couple times to get most of the pieces small, but not liquified. It’s salsa, not soup.

Nectarine Salsa

This was great on a blueberry burger — it really made the whole thing nice and sweet an fruity. It was also good with tortilla chips, both that night and the next day — it didn’t last any longer than that.


Notes:

  • If you make the salsa, I suggest doing that first so that the flavors have time to sit and meld while you make the rest of the meal.
  • Feel free to flavor your burgers however you like. You can always substitute other flavors and sauces to get the right burger consistency with a different flavor.
  • These would be so fun to serve with a toppings bar that guests can use to dress their burger themselves. Maybe a red, white, and blue summer cookout?
  • Both of these burgers made great leftovers. The next day, I had the turkey burger with more nectarine salsa, and the day after that, I had the quinoa burger with pita and Greek yogurt.