Tag Archives: Chocolate

Salted Nutella- & Caramel-Stuffed Chocolate Chocolate Chip Cookies

11 Dec

Whoa! That title is a mouthful. And so are these cookies.

IMG_2963

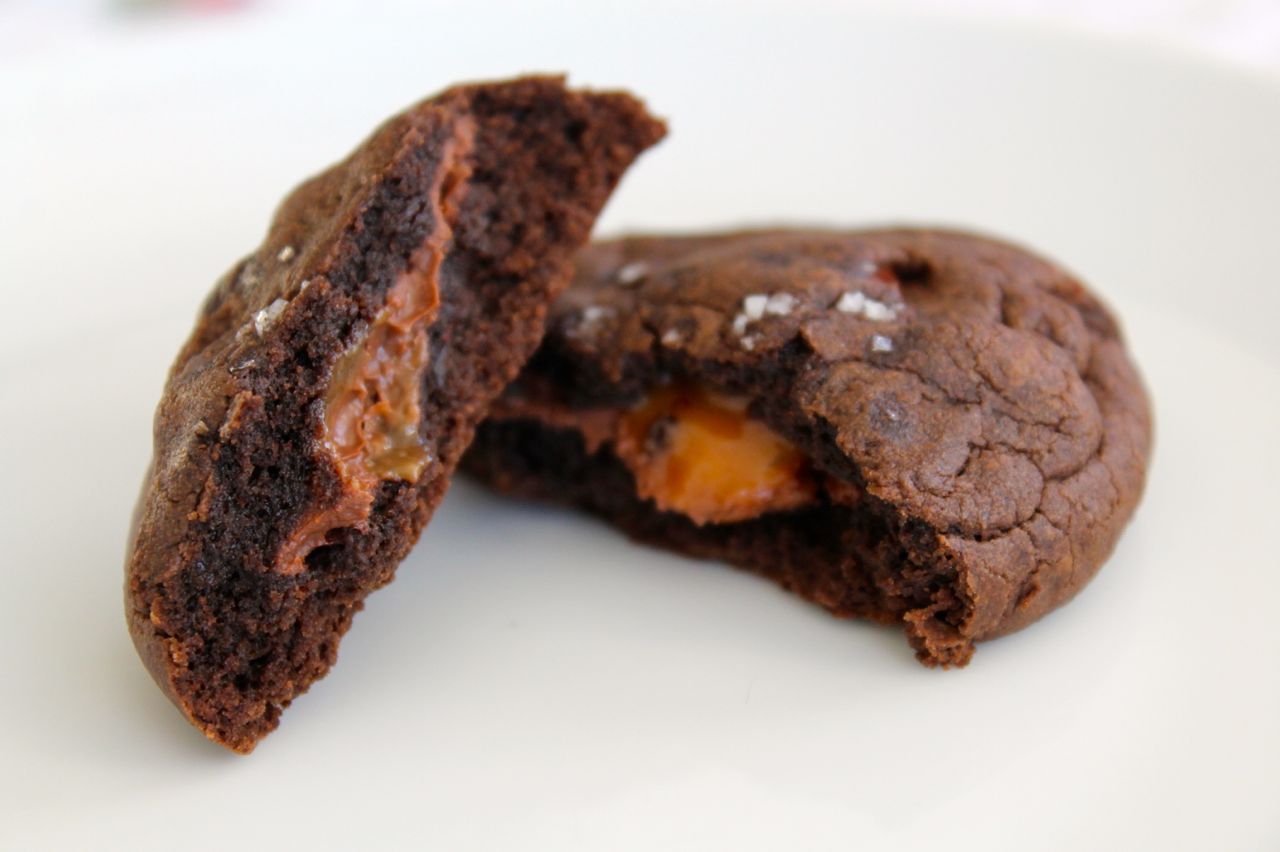
In case you couldn’t tell from the name, these cookies are delightfully (and maybe a little sinfully) decadent. But when I was considering options for the Great Food Blogger Cookie Swap of 2013, I knew I needed something big. And since I went with something a little more mature and restrained last year — Chinese Chai Cookies — I decided to go all out. 2013 seemed to call for it.

Oh hai there little choco chip

As you can imagine, Salted Nutella- & Caramel-Stuffed Chocolate Chocolate Chip Cookies were a bit of a project, but they were worth it. And after I called in reinforcements — my BFF Lauren, aka Betsy Bundt — it really wasn’t too difficult with two people.

As an expert caramel-maker, Lauren took on that project while I whipped up the cookie dough. Once they were both ready, I rolled out balls of dough and pressed them out, Lauren filled them with a bit of caramel and a dab of Nutella, and I rolled out a second cookie disc to press on top and sandwich it all together. The cookie assembling took quite a while, so I finished up that while Lauren managed the multiple batches of cookies going in and out of the oven. See? Teamwork!

IMG_2968

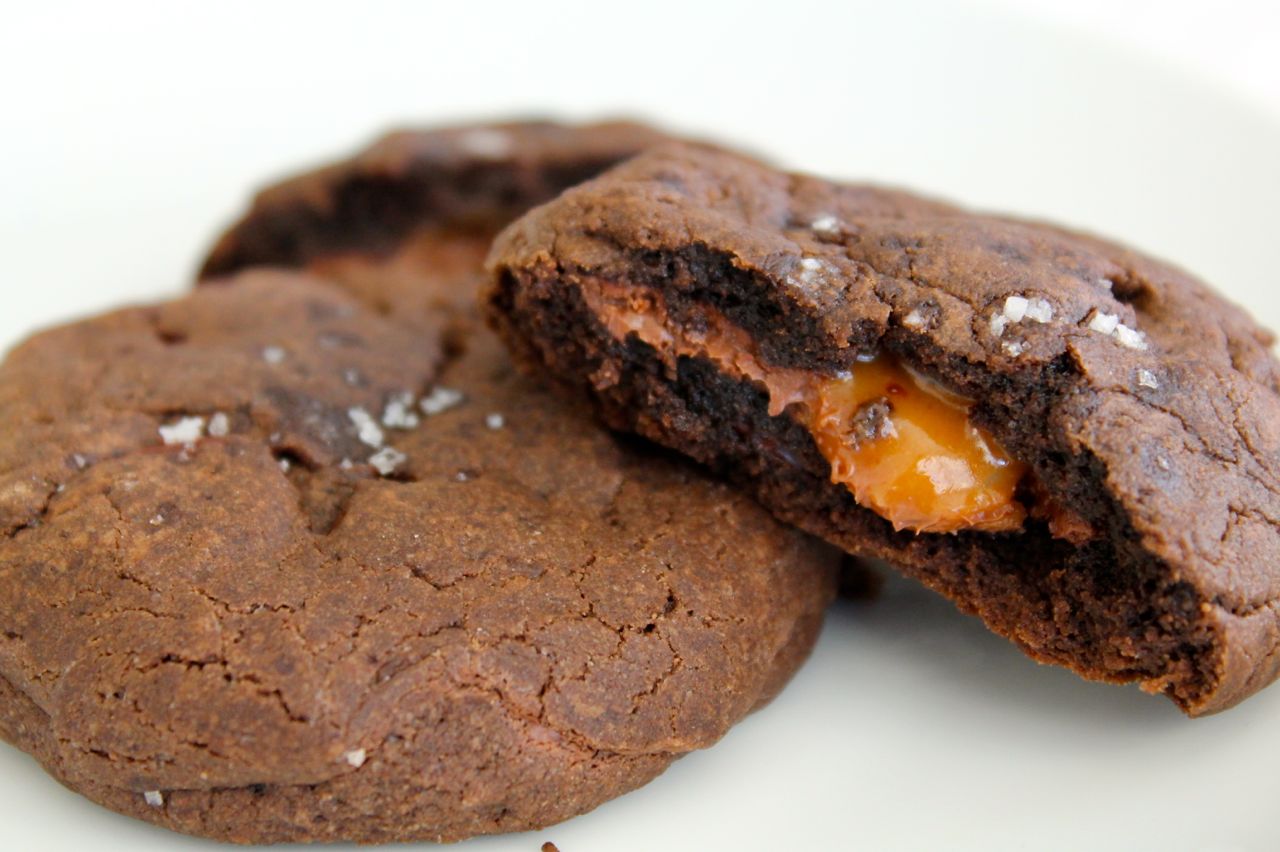
I highly recommend eating these right out of the oven. They’re even gooier and richer and decadent-er. Plus, once they cool, the caramel is a little too tough. In the unlikely scenario that you can’t manage to enjoy the entire batch fresh from the oven and you have a few cookies leftover, just heat them in the microwave for 15-20 seconds before eating so the caramel gets all gooey again.

After I let all the cookies cool down, I packaged them up in adorable little gift boxes and sent them off to my 3 matches from the Great Food Blogger Cookie Swap!

photo 1\photo 3

Before I launch into the recipe for these delectable treats, a couple updates…

1) Today’s the last day to enter my first-ever giveaway! Check it out in last week’s post.

photo (9)

2) Wine & Plum now has an Etsy shop! Right now there’s hand-knit scarves, like the eco-friendly wine and plum scarf pictured here, and creaseless hair elastics. In the next few days I’ll add new jewelry items as well. Order soon and receive your items just in time for Christmas gifts!

scarf

And now the recipe!

Salted Nutella- & Caramel-Stuffed Chocolate Chocolate Chip Cookies from Top With Cinnamon

1/2 cup butter
1 1/2 cups brown sugar
1/2 cup cocoa powder (I used half regular and half extra dark cocoa powder)
2 eggs
1/4 tsp salt
3/4 tsp baking powder
2 cups all-purpose flour
1/2 cup dark chocolate chips
fleur de sel, for sprinkling
approx. 1/2 cup (8 tbsp) nutella
1 recipe for Salted caramel OR 15-16 caramel-filled chocolates
Line a baking tray with parchment paper. Preheat your oven to 350 degrees F.

In a medium saucepan, melt the butter. Take off the heat and stir in the brown sugar and eggs. Then add the cocoa, salt, and baking powder. Stir until well combined. Add the flour and stir until well combined. Fold in chocolate chips.

Make the caramel, if using (follow link for recipe).

Take 1 heaped tbsp of dough and roll into a fat disc shape. Use your finger make a large indentation the centre of the dough; fill the indentation with a small blob of nutella (like 1/4 tsp ish), and top it up with the still-warm salted caramel (or a caramel-filled chocolate). Top with a flattened tablespoon of dough, and seal the edges. (You may need to dab on a little extra dough to seal the edges.)

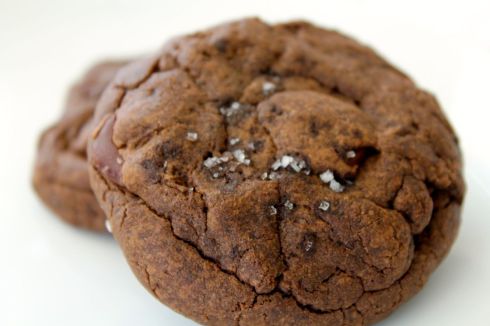
Sprinkle with fleur de sel, and bake for 8-10 minutes.

Yield: 15-18 cookies.

IMG_2956

Linking Up With:

Funday Monday from Still Being Molly
Block Party from Sumo’s Sweet Stuff
Made by you Monday from Skip to my Lou
Inspiration Monday from Twelve O Eight
Time to Sparkle from Love Grows Wild
Wonderful Food Wednesday from All She Cooks
Create It Thursday from Lamberts Lately
Full Plate Thursday from Miz Helen’s Country Cottage
All Things Pretty from Sparkles and a Stove

Advertisement

Biscoff Brownies

23 Sep

I have been hearing so much about Biscoff spread lately! I’ve seen about a bazillion Biscoff-themed pins on Pinterest. And this came on the heels of the BF gently telling me that Biscoff, a.k.a. Europe’s favorite cookie with coffee, is vastly superior to whatever cookies I mistakenly brought home from the grocery store. So when I realized that this Biscoff spread existed and was created out of the same cookie that is Europe’s and the BF’s favorite cookie with coffee, I thought a Biscoff dessert would be appropriate.

I was craving chocolate, so Biscoff Brownies sounded perfect. But here I am using the word “Biscoff” a dozen times in a row, and I didn’t even use actual Biscoff in this recipe. I’m a fraud! I used a knock-off “cookie spread” from Trader Joe’s. And let me tell you, it was delicious.

Look at those Biscoff swirls!

I may try to use this brownie recipe either on its own or with other spreads, like Nutella. The brownies are so ooey-gooey and mushy and fudgy — my favorite kind of brownies. The original recipe called for 3 eggs, and I only had two, so I substituted 1/4 cup homemade applesauce for the third egg. Maybe that’s what made it extra gooey. Just in case, I will definitely make it with applesauce from now on. Also, the original recipe called for vanilla extract, and I just now realized that I completely forgot to put it in. I didn’t even notice. But do with that information what you will.

They’re so good! There may or may not be a hole cut into the middle of the brownie dish right now… I like the gooey center pieces so I avoid the edges. I’m going to go off to have another brownie while I research other Biscoff recipes now. Cheers!

Mmm... chocolatey gooey goodness

Biscoff Brownies adapted from Unsophisticook

3/4 cup unsalted butter, melted
1 1/2 cups granulated sugar
1 teaspoon kosher salt
2/3 cup cocoa powder
2 eggs
1/4 cup applesauce
1 cup all-purpose flour
1/2 teaspoon baking powder
1/2 cup Biscoff Spread, melted

Preheat oven to 350 degrees. Line a square 8×8 or 9×9 baking pan with parchment paper or give it a coating of baking spray.

Melt the butter in the microwave. Whisk in sugar, salt and cocoa powder.

In a large mixing bowl, whisk the eggs well, and then whisk in the applesauce and chocolate mixture until well combined.

In a separate mixing bowl, whisk together the flour and baking powder until well combined. Stir the flour mixture into the chocolate mixture until just combined.

Pour the batter into the prepared pan. Melt Biscoff Spread in the microwave and drizzle over the top of the brownie batter. Use a clean butter knife to swirl the Biscoff Spread into the batter.

Bake at 350 degrees for 35-45 minutes. When you jiggle the pan, the center of the brownies should be firm. Cool on a wire rack.

Linking up With:

Funday Monday from Still Being Molly and Lipgloss and Crayons
Block Party from Sumo’s Sweet Stuff
Made by you Monday from Skip to my Lou
Inspiration Monday from I Should Be Mopping the Floor, Twelve O Eight, Redhead Can Decorate, and Scattered Thoughts of a Crafty Mom
Melt In Your Mouth Monday from Make Ahead Meals for Busy Moms
Time to Sparkle from Love Grows WildInside BruCrew LifeThe Recipe Critic, and The Gunny Sack
Create It Thursday from Lamberts Lately
All Things Pretty from Sparkles and a Stove and My Fashion Forward Blog

Dairy-Free Chocolate Mousse

15 Jul

Mmm this is so delicious. Maybe not quite as delicious as the Best Chocolate Mousse Ever, but still pretty incredible. I have a friend who is both gluten-free and dairy-free, so coming up with a dessert that fit those parameters was difficult – I mean, I bake, right? But I was so excited for this amazing find. So simple, so quick, and so tasty.

IMG_2002

As long as you remember to refrigerate the coconut milk in advance, this only takes about 5 minutes to put together. Plus, mousse is like grown-up pudding. It’s as delicious and creamy as a Snack Pack, but super classy. To make it even classier, serve it out of something ridiculous like a martini glass or something a little less ridiculous like a stemless wine glass. And then when everyone’s done, bring out the bowl and mixing spoons and let people lick them clean. Classy.

For my mousse, I used a combo of regular Hershey’s cocoa powder and Special Dark Hershey’s cocoa powder. I haven’t tried it, but I imagine spending money on some high-quality cocoa powder would be worth it. There’s not a ton of sugar in this recipe, so unless you like really dark chocolate, be careful using too dark chocolate.

Also, need a good way to use the leftover coconut water? Try using it as the liquid base in smoothies! Super tasty with banana and pineapple.

Okay, go try this! It’s super easy to get a delicious, smooth, creamy, chocolate-y with a slight hint of coconut dessert that’s not too terribly unhealthy for you. I might just leave a can of coconut milk in the back of the fridge for whenever I need a quick chocolate fix.

Mmmousse

Dairy-Free Chocolate Mousse from The Urban Poser

1 cup full fat (canned) coconut milk, cream only (takes about 2 cans)
4-5 tablespoons cocoa
3 tablespoons honey or vegan alternative or stevia, to taste
1 teaspoon vanilla

Chill your cans of full-fat coconut milk in the refrigerator overnight.When ready to make the mousse, open up the cans and scoop the thick coconut cream into a large bowl, leaving the liquid behind. Add the rest of the ingredients to the bowl and beat the mixture for 2-5 minutes.Serve. Excellent with strawberries, raspberries, etc.

Linking Up With:

Funday Monday from Still Being Molly and Lipgloss and Crayons
Market Yourself Monday from Sumo’s Sweet Stuff
Made by you Monday from Skip to my Lou
Anything and Everything Blog Hop from My Thrifty Chic
Time to Sparkle from Love Grows WildInside BruCrew LifeThe Recipe Critic, and The Gunny Sack
Link Party Wednesday from Lil’ Luna
Create It Thursday from Lamberts Lately
All Things Pretty from Sparkles and a Stove and My Fashion Forward Blog

Chocolate Lasagna

3 Jun

My coworkers and I had a great conversation about what I should call this amazing dessert. “Chocolate lasagna” was the name of the original recipe I found, which suited me just fine. They thought it sounded gross, since they immediately started thinking of noodles, cheese, chocolate, and tomato sauce, which I admit, sounds pretty disgusting altogether. But really, the ‘lasagna’ part of the name more just refers to the fact that it’s layered in a baking dish.

When I saw the picture with the list of ingredients, I thought it was a perfect dessert to make for my brother’s birthday. Like me, he’s a choc-aholic. Or I guess I’m like him, since he’s older than me. At any rate, neither of us can ever get enough chocolate, especially dark chocolate and mint chocolate.

He and his new wife joined me and my slightly-less-new husband for dinner at a German restaurant in Durham, Bavarian Brathaus, which was quite an experience. The live band consisted of a clarinet and tuba played by two very loud gentlemen who occasionally interrupted their playing to sing/shout quite boisterously. My brother’s favorite foods are chocolate (as noted), German (he lived in Germany while he was in the military), and Italian (isn’t that one of everyone’s favorites?). So following up a trip to a German restaurant with chocolate lasagna seemed appropriate.

Chocolate Lasagna

This recipe is really less about cooking than it is about assembling. I prefer to make dishes that require a little more cooking and far more whole and natural foods, but there is nothing wrong with a little boxed, pre-made sugary goodness every now and then. Plus, after a really long week, it was awesome to zone out, munch on some Double Stuf Oreos, and put this together pretty easily. (And no, I didn’t use the Double Stuf I already had for this recipe. The Double Stuf are for eating, the regular Oreos are for making crusts with. I don’t find it weird at all that I had two entire packages of different types of Oreos in my home, Judgy McJudgerson.)

Do you have any suggestions to name this dish? Since none of my coworkers could come up with a better name, Chocolate Lasagna it is… for now. If you have any brilliant ideas, let me know in the comments.

Someone got a little messy plating this giant serving. Still delicious with all the layers mixed together.

Someone got a little messy plating this giant serving. Still delicious with all the layers mixed together.

Chocolate Lasagna from Center Cut Cook

1 package regular Oreo cookies (not Double Stuf)
6 tablespoons butter, melted
1 8-oz package cream cheese, softened
1/4 cup sugar
2 tablespoons cold milk
1 12-oz tub Cool Whip, divided
2 3.9-oz packages instant chocolate pudding
3 1/4 cups cold milk
chocolate chips and Oreo crumbles for topping

Crush the entire package of Oreos into crumbles. Use a food processor, or place in a large sealed plastic bag and wail on ’em with a can of beans or a rolling pin or something. Reserve a handful of crumbs for the topping.

Transfer the rest of the crumbs to a 9×13″ baking dish, and spread evenly. Drizzle the melted butter over the top, and use a fork to incorporate the butter into the cookie crumbs. Press the crumbs into the bottom of the pan to create an even crust layer. Place the pan in the fridge.

In a large bowl, mix the cream cheese with a mixer until light and fluffy. Add 2 tablespoons milk and sugar. Mix well. Stir in about 1/3 of the Cool Whip. Spread the mixture evenly over the Oreo crust.

In a large bowl, combine the pudding with 3 1/4 cups cold milk. Whisk for several minutes until the pudding starts to thicken. Spread the mixture evenly over the cream cheese layer. Place in fridge and allow to sit for at least 5 minutes.

Spread the remaining Cool Whip over the pudding layer. Sprinkle chocolate chips and reserved Oreo crumbles evenly over the top. Place in the freezer for 1 hour, or the refrigerator for 4 hours before serving.

Chocolate Lasagna

Linking Up With:

YOLO Mondays from Still Being Molly and Lipgloss and Crayons
Market Yourself Monday from Sumo’s Sweet Stuff
Made by you Monday from Skip to my Lou
Anything and Everything Blog Hop from My Thrifty Chic
Time to Sparkle from Love Grows WildInside BruCrew LifeThe Recipe Critic, and The Gunny Sack
Create It Thursday from Lamberts Lately
All Things Pretty from Sparkles and a Stove and My Fashion Forward Blog

Oh, Fudge!

7 Jan

Just before the holidays, my dear friend Hillary came over, and we spent an afternoon making fudge! We made huge delicious batches of chocolatey goodness to cut up and deliver to coworkers in cute little holiday packages.

I love making holiday treats for my office. I only have 9 coworkers, so it’s not that difficult to prepare for everyone, but some years, it just doesn’t happen. I have our huge annual fundraising event in early December, and it seems like by the time that’s over, I’m just wiped. I don’t have the energy for much.

But I had been thinking about it, and thought about possibly fudge. And the next day, Hillary called to say we should get together to make… fudge! So that seemed like a clear sign that it needed to happen. With a partner in the kitchen, who coincidentally was interested in the same project as I was, it was quite fun to whip these up. And, like all my favorite projects, it was super easy.

We set out to make 3 different flavors. Classic chocolate, salted chocolate peanut butter, and a double batch of mint chocolate chip. Yum!

And I may or may not have cracked myself up multiple times by muttering “Fudge!” when I screwed up or dropped something, and then realizing what I said. Ha.

FUDGE!

So here you go… 3 recipes in one post! It’s your lucky day.

Classic Chocolate Fudge adapted from Martha Stewart

2 tablespoons butter, cut into small pieces
3 cups semisweet chocolate chips
1 can (14-oz) sweetened condensed milk
1/2 teaspoon vanilla
1/8 teaspoon salt

Coat an 8-inch square pan with cooking spray and line with parchment paper, leaving extra paper on all sides.

Place the butter and chocolate chips in a medium heatproof bowl. Microwave for 30 seconds, then remove and stir well. Repeat, microwaving at 30-second intervals and stirring well between each time, until chocolate is melted.

Add condensed milk, vanilla, and salt. Stir well.

Pour immediately into prepared baking dish and spread evenly. Refrigerate until set, 2 hours or overnight (wrapped). Using the overhanging parchment paper, lift from pan and cut into squares.

Classic

Salted Chocolate Peanut Butter Fudge adapted from Martha Stewart

2 tablespoons butter, cut into small pieces
2 cups semisweet chocolate chips
1 can (14-oz) sweetened condensed milk
1 cup chunky peanut butter
1/2 teaspoon vanilla
Sea salt (optional)

Coat an 8-inch square pan with cooking spray and line with parchment paper, leaving extra paper on all sides.

Place the chocolate chips in a medium heatproof bowl. Microwave for 30 seconds, then remove and stir well. Repeat, microwaving at 30-second intervals and stirring well between each time, until chocolate is melted.

Add condensed milk, peanut butter, vanilla, and salt. Stir well.

Pour immediately into prepared baking dish and spread evenly. Refrigerate until set, 2 hours or overnight (wrapped). Using the overhanging parchment paper, lift from pan and cut into squares. Top with coarse sea salt.

Mmm... sweet & salty...

Mint Chocolate Chip Fudge adapted from Martha Stewart

2 tablespoons butter, cut into small pieces
3 cups semisweet chocolate chips
1 can (14-oz) sweetened condensed milk
1/4 teaspoon peppermint extract
Andes baking chips

Coat an 8-inch square pan with cooking spray and line with parchment paper, leaving extra paper on all sides.

Place the butter and chocolate chips in a medium heatproof bowl. Microwave for 30 seconds, then remove and stir well. Repeat, microwaving at 30-second intervals and stirring well between each time, until chocolate is melted.

Add condensed milk and peppermint. Stir well.

Pour immediately into prepared baking dish and spread evenly. Top with mint chips, as desired.

Refrigerate until set, 2 hours or overnight (wrapped). Using the overhanging parchment paper, lift from pan and cut into squares.

Mint Chip

Linking up for:

YOLO Mondays from Still Being Molly and Lipgloss and Crayons
Monday Meet Ups from Covered in Grace
Made by you Monday from Skip to my Lou
Make Something Monday from Sarahndipities

Microwave Chocolate Pecan Toffee

24 Dec

It’s Christmas Eve! For those of you who celebrate Christmas, I hope you’re ready to enjoy a wonderful day. I have kind of mixed results on my holiday preparedness this year. I had most of my gift shopping done early, but we didn’t decorate our place at all. Once it got close to the holidays and we still hadn’t done anything, the BF and I agreed that it was kind of silly to put a lot of effort into decorations when it’s just the two of us here and we’ll be spending much of our holiday time at our parents’ houses. So instead of going all out, I just put little tiny star ornaments on our bamboo plant. That works, right?

O Christmas Bamboo O Christmas Bamboo...

All I have left to do is bake! Today, I’ll definitely be making a couple apple pies — one for each family’s house — and the apple cinnamon baked oatmeal. After I talk to my brother and sisters, that plan might be slightly expanded. After all, it’s not Christmas without coconut balls.

If you still need something to add to your family’s dessert table or something to take to a holiday party, try this amazing toffee. It’s super easy, so you’ll be able to get it done in between wrapping those last-minute presents and blow-drying your hair.

The only thing better than a delicious candy recipe is an easy delicious candy recipe. I had never made toffee before, and for some reason, I had it in my head that it’s a difficult thing to make. But it wasn’t at all. It was actually super simple. And DELICIOUS. Toffee is kind of like a hard caramel. Yum!

YUM

Somehow this recipe came to me through a long chain: a friend of the stepmom of an ex-boyfriend of a friend. So who knows where it first came from, but I’m glad it arrived in my inbox.

I made a few batches of toffee as gifts for volunteers who helped out with a big work event. It was quick and easy:

Microwave all the toffee ingredients together.

Step 1

Pour it on a pan and spread the chocolate chips over top that.

I have no idea what's up with that weird shadow.

Let it cool/harden, and then break it up into bite-sized pieces.

DONE

I packaged them up in cute little boxes that I got from AC Moore and tied some ribbon around them. Adorbs.

Packages tied up with string...

The only downside to this recipe is that it can get a little expensive. It doesn’t really make a ton of toffee, especially if you’re trying to fill a box, so I had to make quite a few batches. With butter, chocolate, and nuts… not the cheapest.

But it’s so delicious and good-looking, it makes an excellent gift. After I packaged all the pieces up, I collected all the leftover little pieces that were too small to load into the boxes, chopped them up even smaller, and packaged them in a jar as Toffee Crunch Ice Cream Topping. Yum!

Toffee Crunch Ice Cream Topping... It's a little frosty from the fridge, but dang if I'm not craving a bowl of ice cream now.

Well, all that’s left is the recipe. Hope you enjoy it. Happy Holidays!!

Microwave Toffee with Chocolate and Pecans

1/2 cup finely chopped pecans
1 cup (2 sticks) butter
1 cup sugar
1 teaspoon salt
1/4 cup water
1 cup semisweet chocolate chips

Coat the sides of a large mixing bowl with butter and place the remaining butter in the bowl. Add sugar, salt, and water; do not stir. Microwave on high for 11 minutes or until mixture begins to turn light brown. Pour onto a greased cookie sheet.

Sprinkle chocolate chips over the toffee and let stand 1 minute. Spread chocolate over the toffee to form a melted layer, and sprinkle with pecans. Chill until firm.

Break into bite-size pieces. Package or serve. Yields about 1 pound.

Delicious delicious toffee

Linking up for:

Pumpkin Brownies

12 Nov

After the Pumpkin Spice Cake and the Whole Wheat Pumpkin Muffins, here’s my last pumpkin recipe to share with you: Pumpkin Brownies! I’m not sure what goes better with pumpkin than chocolate. After looking through a million versions, I finally settled on a recipe from Delishhh.com.

Mmm... look at that swirl

I thought these were exceptional, and the addition of Ghiradelli chocolate chips was a stroke of genius. They were slightly more cake-like than fudge-like, and while I usually prefer the latter, they were amazing. Especially when warmed and topped with a scoop of ice cream, which I must admit I enjoyed probably 5 out of 6 nights last week. As I mentioned with my previous pumpkin recipes, I used pumpkin pie filling instead of regular pumpkin puree, which the original recipe called for. But I think you’re good either way — the pie filling makes the brownies a little sweeter and richer in the end.

Oh my goodness, look at that chocolate chip right there.

I baked these in my brand-new Bake and Store Baker from Crate and Barrel — a highly convenient wedding gift. After they cooled, all I had to do was snap the lid on and throw them in the passenger seat to take to a party. Perfect.

Oh, and by the way — one can of pumpkin pie filling is the perfect amount for this recipe, Whole Wheat Pumpkin Spice Muffins, AND the Pumpkin Cake with Spiced Buttercream. Just to give you a heads up there.

Pumpkin Swirl Brownies from Delishhh.com

¾ cup all purpose flour
½ tsp baking powder
½ tsp salt
¾ cup butter (melted)
1 ½ cups white sugar
2 tsp vanilla extract
3 eggs
¼ cup cocoa powder
½ cup semi-sweet chocolate chips
½ cup pumpkin pie filling
1tsp cinnamon
½ tsp ground cloves
½ tsp nutmeg

Pre-heat the oven to 350 degrees and spray an 8×8 inch baking dish with cooking spray.

In a bowl, whisk to combine flour, baking powder, and salt.

In a separate bowl, mix together melted butter, sugar, and vanilla. Beat in each egg one at a time. Add in the flour mixture a little at a time, and mix until combined. Divide the batter in half evenly into 2 separate bowls.

In one of the bowls, blend in the cocoa powder and chocolate chips. In the second bowl of batter, stir in pumpkin pie filling, cinnamon, cloves, and nutmeg.

Spread the chocolate batter into the bottom of the baking dish. Pour the pumpkin batter over that. Drag a kitchen knife or spatula through to mix it a bit. (This creates a mostly chocolate base with a mostly pumpkin top. If you want a more marbled brownie, pour half of each batter in at a time for a total of four layers, and then swirl the knife through it.)

Bake in the oven at 350 degrees for 40-45 minutes or until a toothpick inserted into the center comes out clean. Cool and cut into squares.

Linking up for:
YOLO Mondays from Still Being Molly and Lipgloss and Crayons
Monday Meet Ups from Covered in Grace
Made by you Monday from Skip to my Lou
Linky Party with Fine Craft Guild

Chocolate Stout Cupcakes with Kahlua Buttercream Frosting

1 Jul

Or “chocolate drunkcakes.” Whichever name you prefer.

I made these for a coworker’s going away party. She loves Guiness, so I found this great recipe for cupcakes. They called for Irish Cream (like Bailey’s), but since she loves Kahlua and I already had a little on hand, I went with that instead. My sister came over to help, and we got started.

One perfect little drunkcake.

Cupcakes

I preheated the oven to 350 F while Steph got to work on the chocolate/beer mixture. In a medium saucepan, she added 1 cup (2 sticks) unsalted butter and 1 cup Guinness beer. After she brought it to a simmer over medium heat, she whisked in 3/4 cup Ghiradelli sweet ground chocolate.

While she did that, I whisked together the dry ingredients: 2 cups flour1 cup sugar1 1/2 teaspoons baking soda, and 3/4 teaspoon salt.

A little note of explanation here: The original recipe called for double the sugar but to use unsweetened cocoa powder. Since I only had sweetened cocoa on hand, I used that and halved the sugar. Between that and the yeasty beer, the cupcakes came out very bread-like. (When the BF walked in the house, he shouted, “Whoa, it smells good in here! Where’s the bread?”) Most people thought that with the super-sweet frosting, the less-sweet cupcake paired perfectly. But having a ridiculous sweet tooth myself, I thought they could have been sweeter.

Okay, back to it. In a large bowl, Steph beat together 2 eggs and 2/3 cup sour cream. Then we added the chocolate mixture and beat to combine. And then the flour mixture, beating just until combined. We lined the cupcake pan with paper liners, filled them about 3/4 way full, and then baked about 18 minutes, until they passed the toothpick test.

Frosting

While they baked, we got to work on this amazing Kahlua buttercream frosting.

While Steph beat 1 cup (2 sticks) softened butter in a mixing bowl, I sifted about 2 1/4 cups powdered sugar. She added in about half the sugar and mixed that up, then we added 3 tablespoons Kahlua and mixed that in. We added the rest of the sugar, except a last little bit. Keep tasting your frosting and stop adding sugar when you think it’s good. You want to make sure you can actually taste the Kahlua.

While we waited for the cupcakes to cool, I made myself a white russian with the rest of the Kahlua. This is a key part of the recipe.

Once the cupcakes were cool and the frosting was ready, I loaded up my pastry bag and piped a healthy amount on top of each cupcake. Super delicioso!

DRUNKCAKES

Chocolate Mmmousse

22 Jun

Get it? Mmmousse because it is so delicious you will be like “MMMMM.” Yeah.

Mmm... look at THAT

I needed a good dessert for a dinner party, and I must say that my first attempt at mousse was pretty much perfect. (There’s no room for humility here. It was that delicious.) Not like I can really claim much from it anyway – I followed Ms. Martha Stewart’s chocolate mousse recipe to a T. I cannot understate how amazing it was. I actually doubled the recipe so I would have it for two different occasions. But I will share the recipe below in its original dimensions, which would serve about 6 people for dessert.

Some mousses use raw eggs, and one thing I like about this recipe is that you cook the eggs. Makes me feel better. Raw – blech. I separated 4 eggs and then in a medium saucepan, I whisked together 4 egg yolks2 tablespoons sugar, and 3/4 cup heavy cream. I cooked it over medium heat for 7-10 minutes, until it thickened up to the point where it would stick to the spoon a bit (but don’t let it boil!).

While that cooked, I melted 8 ounces semisweet chocolate by heating it at 30 second intervals in the microwave and stirring well in between each session. I used some semisweet chocolate chips but didn’t have quite enough, so I added in pieces of random chocolate bars I had stashed around the apartment and in my purse. (That’s not weird, right?) When the egg mixture was done, I stirred in the melted chocolate and 1 teaspoon vanilla extract.

I strained the chocolate mixture through a fine mesh sieve to make sure no chunks stuck around. I popped the bowl of chocolate into the fridge to chill for a bit.

While the chocolate chilled, I worked on the whipping cream. I beat another 1 1/4 heavy cream in a medium mixing bowl with a hand mixer. I added 2 tablespoons sugar and continued beating. I was supposed to stop when it formed “soft peaks,” but the weird thing about whipped cream is that it looks not quite done forever and then BAM it’s suddenly past done. But it worked out okay. I mixed about one third of the cream into the chocolate mixture. Then the original recipe says to gently fold the rest of the cream into the chocolate. But I was having trouble getting it to mix evenly, so I ended up stirring somewhat vigorously, which broke down the too-whipped whipped cream perfectly. See? Worked out okay.

That's a nice looking glass you got there.

I scooped them into individual serving dishes, covered, and chilled them. Excellent presentation and more importantly, soooo delicious. (They need to chill for at least 30 minutes, and then Martha says it will last up to 3 days, though I ate mine a week later and was fine.)

Now just imagine that Ryan Gosling is holding that spoon offering you the most delicious mousse in the world. Mmmm.

ALT TEXT FTW.

1 Cake, 3 Ways

24 Feb

I promised a cake to a friend because of a competition we held at work, and when the time came around, she wouldn’t tell me what kind of cake she wanted. But I owed it to her, so I didn’t want to back out or forget. So since I didn’t know which cake to bake for her, I just baked three.

But I thought this through. Mixing up three different batters seemed like it would take up a lot of time. Obvi. So I made up a basic batter without any flavoring, divided it into three bowls, and then added separate flavorings to each one. And while the cakes were baking, I made up 3 different fillings for each cake. And then I made one vanilla buttercream frosting to top everything off. Game plan: coconut cake with coconut cream filling and vanilla buttercream frosting, lemon cake with lemon filling and vanilla buttercream frosting, and almond cake with chocolate filling and vanilla buttercream frosting. Hells yeah.

I started by mixing up the base. I sifted together 2 1/2 cups flour2 1/2 teaspoons baking powder, and 1/2 teaspoon salt. In a separate bowl, I mixed 2 cups white sugar3/4 cup butter, and 3 eggs with an electric mixer for about 1 minute. Then I alternately mixed in the flour mixture and 1 cup milk to the sugar mixture.

3 Cake Batters

I divided this base into 3 bowls.

  • Bowl 1: I added 1 teaspoon vanilla and 1/3 cup coconut flakes.
  • Bowl 2: I added 2 teaspoons fresh squeezed lemon juice and 1/2 teaspoon lemon zest.
  • Bowl 3: I added 2 teaspoons almond extract.

With my batters ready, I baked them at 350 F in batches, as my cake pans allowed. I used Wilton’s Mini Tasty-Fill Cake Pan Set. Sounds ridiculous, but it’s cool. It makes mini cake halves with a depression in the center of each one so that when you stack them, there’s a hollow center to add filling to. Of course, if you don’t have a smaller cake pan like this, you could make cupcakes and fill those. My small cakes baked 22 minutes or so. Cupcakes would probably take 18-20 minutes, but just keep checking with the toothpick test until they’re done.

3 Cakes Baking

While my cakes baked, I made the fillings.

  • For the coconut filling, I made up a half batch of the same filling that I used in my Simpler German Chocolate Cake, except I omitted the pecans.
  • For the lemon filling, I made a slightly different version of the original recipe I found here. In a saucepan, I mixed together 2 teaspoons lemon zest2 1/2 tablespoons lemon juice, and 1 teaspoon flour. I mixed that until it was smooth, and then I added 3 tablespoons unsalted butter and 3/4 cup sugar. While I brought that to a boil, I whisked 2 egg yolks in a bowl until smooth. I put a small bit of the lemon mixture into the eggs and stirred until smooth, then I added the egg mixture to the lemon mixture, stirring well. Do this part quickly so that the lemon mixture doesn’t boil for longer than a minute or so. Then I reduced the heat to low and stirred constantly for about 5 minutes. Then I removed it from the heat and let it cool. (Note: Don’t skip the step of stirring the eggs with a small amount of the lemon mixture first. That’s so you don’t cook egg chunks into your lemon filling.) (Other Note: I thought this was a little too thick. If I made this again, I would follow the original recipe more closely. I think I had too much sugar and not enough liquid.)
  • For the chocolate filling, I melted 1/2 stick (1/4 cup) unsalted butter and 1/2 cup of a broken up Hershey’s Bar with Almonds in the microwave, stirring well every 20-30 seconds until smooth.

While my fillings cooled, I made the frosting. You can find the original recipe for Vanilla Buttercream Frosting at savorysweetlife.com.

Then it was time for assembly. I matched the cakes to their fillings and filled the center of each one. After I sandwiched them together, I frosted them all with the Vanilla Buttercream Frosting.

So that the recipient would be able to tell what’s what, I topped each with something to represent what was inside. Coconut flakes on the coconut cake, chocolate bar bits on the almond-chocolate cake, and yellow and white sprinkles on the lemon cake. I stacked them all on one cake tray, and that was that. 1 cake batter 3 ways!

3 Cakes