Tag Archives: easy

Baked Eggs with Mushrooms & Greens

21 Feb

One weekend last month, we had a lazy Sunday at home, reading books, watching movies, and relaxing. The only time I left the house was to take a pleasant walk to Starbucks in the suddenly mild, sunny weather with the BF. It was glorious. It also reminds me of how much I miss nice weather, now that we’re setting record low temps here in North Carolina: 7° yesterday!

Since I was ignoring the dirty bathrooms and the Christmas tree still standing in the corner (un-decorated, at least – I did manage to get the lights and ornaments put away only a couple weeks after Christmas), I thought I could at least cook a decent meal for us. I was enjoying my book and tea too much to get off the couch at breakfast time, so I made this for lunch.

My friend Emily made this for brunch a few weeks ago, and I’ve been wanting to re-create it since then. Mine wasn’t as good as hers, but it was still pretty tasty. I’m sure I’ll make it again and see what I can do to improve it – I’m thinking of adding cheese into the mix, maybe something deliciously creamy like gruyere.

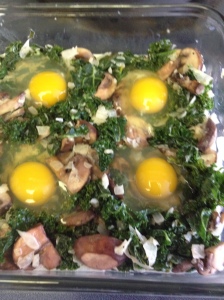
It’s pretty simple: cook up the greens, onions, and mushrooms. Pour that into a baking dish. Then crack the eggs right on top.

eewwww

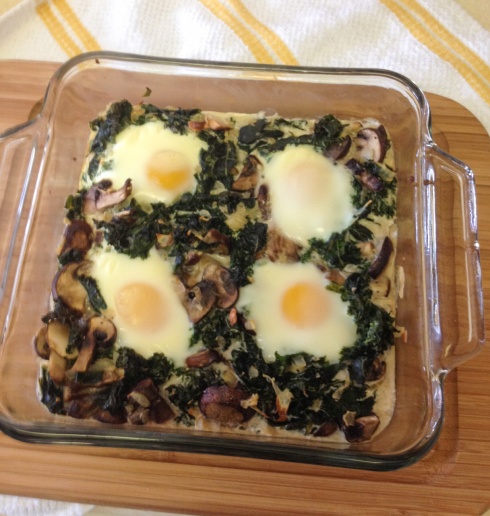
Looks kinda gross, doesn’t it? But it turns out pretty delicious in the end.

egg bake 1

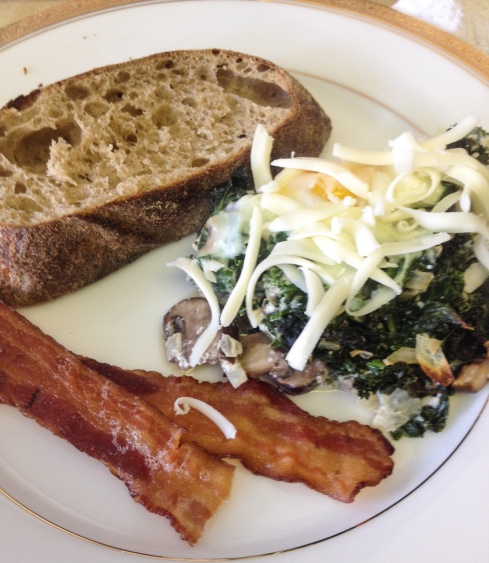
With a side of toast and bacon, this became a substantial and delicious lunch. I think it would be great for any meal of the day, actually, but I’m weird like that. I used half kale and half spinach, which I really liked, though the original recipe called for just spinach. Use what you like!

egg breakfast 2

Baked Eggs with Mushrooms & Greens, adapted from Smitten Kitchen

3 oz (about 2 handfuls) kale, de-stemmed and roughly chopped
3 oz (about 1 handful) spinach
2 garlic cloves, finely chopped
1/2 onion, finely chopped
2 T unsalted butter
5 oz (about 1 cups) mushrooms, sliced
1/3 cup half and half
salt, pepper, and nutmeg to taste
4 large eggs
1/4 cup of shredded mozzarella

Preheat the oven to 450 F.

Bring 1/2″ of water to a boil in a large skillet. Add the kale and cook, covered, until it begins to wilt, about 2 minutes. Add the spinach and cook over medium-high heat, covered, until all the greens are wilted, about 1-2 minutes. If there’s any water left in the pan, drain in a colander, then transfer to an 8×8 baking dish.

Wipe the skillet dry, then add the butter and melt over medium heat. Add the onions and garlic, and cook until fragrant, about 2-3 minutes. Add mushrooms and cook, stirring, until mushrooms are soft, about 3 minutes. Stir in half and half; a dash each of salt, pepper, and nutmeg; and bring to a simmer. Add the mushroom mixture to the baking pan and stir well to incorporate greens.

Make 4 indentations in the greens-and-mushroom mixture. Break an egg into each indentation and bake, uncovered, until eggs are set as desired. (7-10 minutes will have set egg whites with runny yolks; I cooked it 12-15 minutes so the yolks were also set.)

Lightly season with salt and pepper; sprinkle with shredded cheese.

Easy Shrimp & Green Bean Stir Fry

3 Feb

I rarely eat seafood, and I even more rarely cook it myself. But I was inspired the other night to try something new, so I stopped by Whole Foods and picked up some shrimp. And after reading the grossly-named but helpful book Gutbliss, I have been making efforts toward “clean eating.” According to the book, this means no dairy, gluten, sugar, artificial sweetener, soy, or alcohol. I did a 10-day cleanse and since then have been at least trying to consider clean food for a good portion of my meals. (It’s really hard for me to keep away from cheese and chocolate though!)

All this to say that in searching for a recipe for dinner, I wanted something that fit the bill for both clean eating and a quick weeknight meal. I’ve found that Asian-inspired stir fries are the best bet here.

stir fry 1

The BF and I both enjoyed this stir fry and agreed we should add it to our weeknight repertoire. It was not extremely flavorful, though I’m sure if you wanted it to be more so, you could easily add more garlic, ginger, and/or oyster/fish sauce. But I personally liked that there was enough of those flavors to be noticeable but not so much that you couldn’t still taste the natural flavor of the shrimp and vegetables.

Stir fries are the best because they’re so easily customizable, so if you’d rather have all broccoli and no green beans, or if you want to leave out the ginger, then just do your thing, you know?

FYI, this recipe made about 3 large portions for us — one dinner for the two of us and one leftover lunch portion for me.

IMG_3070

Easy Shrimp & Green Bean Stir Fry adapted from Food & Wine

2 tablespoons vegetable oil
3 garlic cloves, minced
1″ piece of ginger, peeled and minced
1 green onion, chopped small
1/2 pound shrimp
1/2 pound green beans
1/2 head of broccoli, chopped
1/4 cup chicken or vegetable stock
1 tablespoon oyster sauce
Salt & pepper to taste

Chop vegetables and prepare all ingredients before you begin cooking.

Heat a saute pan until very hot. Add the vegetable oil, and heat until shimmering. Add the garlic and stir-fry for 10 seconds.

Add the shrimp and a pinch of salt. Stir-fry until the shrimp are just beginning to turn pink, about 30 seconds. Add the green beans and 2 tablespoons of the stock and stir-fry until the beans soften slightly, about 3 minutes.

Add the remaining 2 tablespoons of stock along with the oyster sauce and a generous pinch of pepper. Stir-fry until the shrimp are cooked through and the beans are crisp-tender, about 3 more minutes. Serve immediately.

IMG_3073

Linking Up With:

Funday Monday from Still Being Molly
Made by you Monday from Skip to my Lou
Inspiration Monday from Twelve O Eight
Time to Sparkle from Love Grows Wild
Wonderfully Creative Wednesday from All She Cooks
Create It Thursday from Lamberts Lately
Full Plate Thursday from Miz Helen’s Country Cottage
All Things Pretty from Sparkles and a Stove

Dark Chocolate Oatmeal Cookies

20 May

I was craving dark chocolate yesterday, and I had a few free hours. I love spending my Sunday mornings baking and listening to NPR (how Chapel Hill I’ve become!). I whipped these up pretty quickly — they’re not hard to mix up, and they don’t take long to bake.

Mmm

They turned out kind of… weird. The flavor is AMAZING. Very rich and chocolate-y. But the texture was odd. The cookies held together just fine, but then have a sandy texture when you chew them. But still buttery, so kind of like greasy sand. There’s also hardly any oatmeal.

Chocolate-y

I’ll still definitely eat them, because as I said, the flavor is amazing. And the texture isn’t too weird. But I was kind of surprised they were weird. It seemed like this recipe had been posted by quite a few blogs, and none of them mentioned this issue. Maybe I didn’t follow the recipe somewhere. I dunno. Calling all bakers out there: Can you see anywhere in the recipe that you’d edit? I was surprised there was no egg… maybe it needs one or two? Or something else? What do you think?

Update: My coworker had one and said, “I don’t think it’s weird. It’s like a shortbread, which I guess makes sense if there wasn’t any egg in the recipe.” … So I guess she’s got a point! As I’m not the biggest fan of shortbread cookies, I don’t eat them often, so I didn’t really recognize the similarity until she pointed it out. 

Chip-tastic

Dark Chocolate Oatmeal Cookies from Epicurious

3/4 cup all purpose flour
1/4 cup unsweetened cocoa powder
1/2 teaspoon baking soda
1/4 teaspoon salt
1/2 cup (1 stick) unsalted butter, room temperature
1/2 cup sugar
1/2 teaspoon vanilla extract
2 heaping tablespoons traditional oats
1/4 cup semisweet chocolate chips

Preheat oven to 350°F. Line a baking sheet with parchment paper. Whisk first 4 ingredients in a medium bowl.

With an electric mixer, beat butter in large bowl until fluffy. Add sugar and vanilla; beat until blended. Add flour mixture and beat until moist clumps form. Mix in oats with spatula until evenly distributed (dough will be very firm). Add chocolate chips and knead gently to blend.

Using moistened palms, shape 1 generous tablespoon dough into ball. Place on prepared sheet; flatten to 2-inch round. Repeat with remaining dough, spacing rounds about 2 inches apart.

Bake cookies until center is slightly firm and top is cracked, about 16 minutes. Cool on sheet.

Tied up pretty

Linking up with:

YOLO Mondays from Still Being Molly and Lipgloss and Crayons
Monday Meet Up from Covered in Grace
Market Yourself Monday from Sumo’s Sweet Stuff
Made by you Monday from Skip to my Lou
Anything and Everything Blog Hop from My Thrifty Chic
Time to Sparkle from Love Grows WildInside BruCrew LifeThe Recipe Critic, and The Gunny Sack
Create It Thursday from Lamberts Lately
All Things Pretty from Sparkles and a Stove and My Fashion Forward Blog

Green Smoothies

17 Mar

If you’ve been following my posts about the CSA we’re doing, you know that I’ve been having these for breakfast almost every morning. And I haven’t gotten tired of them! They’re so easy and super fast. If you get bored, you can also add in new fruits, veggies, flavors, and other ingredients to the mix. Don’t be turned off by the idea of greens in your smoothie! When you add enough fruits, you don’t taste the greens at all. It tastes like a delicious fruit smoothie, and you get the added benefit of an extra serving of veggies. Kinda like those V8 fruit/veggie juice things.

Here’s a few things I’ve learned while experimenting with smoothies. It’s a lot, so if you’re not in the mood to read my dissertation, just jump to my recipe for a basic green smoothie at the bottom.

Mmm... green

Shopping & Prep

I recommend buying organic greens — since they don’t have a peel or skin, they can absorb a high amount of pesticides and chemicals. For other fruits and veggies, I refer to the Dirty Dozen list (a list of veggies that you should always buy organic). But mostly, I follow this rule: If it doesn’t have a skin (greens) or if I eat the skin (apples), I buy organic. If it has a thick peel that I don’t eat (bananas, citrus, avocado), I don’t bother with organic. I do buy organic dairy products (yogurt, milk, etc).

I have learned to prepare my fruits and veggies way in advance, which makes it a breeze (about 3 minutes) to prepare breakfast each morning. For example, my freezer currently contains a bag of diced fresh pineapple, banana slices, and apple chunks, and I have strawberries and blueberries in the fridge.

I have not bothered with any fancy equipment. I’ve read some blogs that say you need a super expensive blender in order to get a well-blended smoothie, but I’m not spending that much money. I use a knock-off Magic Bullet single-serving blender that my mom got me for probably less than $40. Maybe I’m missing out on incredibly well-blended smoothies, but I doubt it.

Greens

To ensure that your greens blend in smoothly, blend your greens with your liquid first, and then add the rest of your ingredients. You can use any kind of greens, but each is going to be slightly different.

When I get a big bunch of greens, I go ahead and wash them and store them right in my salad spinner. Then they’re ready for each morning, when I pull out a couple handfuls and rip them up just a bit while I stuff them into the blender.

I learned from a little internet research that many greens, especially those from the brassica/cruciferous family (pretty much everything on my list except for spinach and lettuce) have a natural chemical that can disrupt hormone function. This is really not an issue for most people because you’d have to eat a TON of greens every single day. But since I already have thyroid problems (and my spring CSA has given me almost entirely brassica vegetables), I was a little more concerned. The good news is that cooking them can help. So for brassica greens, I wash them, rip them up a bit, steam them, and then store them in a bowl in the fridge. Then each morning I can just pull some up and stuff them into the blender. Easy peasy.

  • Lettuce: Easiest to mask their flavor because they’re super mild. But of course, they also have the least nutritional benefits. If you’re really not sure about green smoothies, start here and work your way up to something a little more green. OR… this can be a great way to use up slightly wilted salad lettuce. I used butterhead, which was great. Romaine would be great too.
  • Spinach: A classic in green smoothies. More health benefits then lettuce but still an easy flavor to mask with fruits.
  • Kale: A standard in green smoothies. Super healthy! To prepare for a smoothie, I prefer to cut the stems out before I chop them up. If you don’t mind yours a little chunky, keep the stems. They’re edible and full of nutrients. When blended, you may see some flecks, but you won’t notice any chunks when drinking. Check your teeth afterward though.
  • Turnip greens: They blend really smoothly. They have a slightly more green taste, but not noticeable if you blend in stronger or sweeter flavors like banana and sweet juices.
  • Kohlrabi leaves: Same as turnip greens.
  • Collards: Same as turnip greens.
  • Beet leaves: Really mild flavor. A great way to use up greens that you usually throw away. They will turn your smoothie pink instead of green.
  • Mustard greens: No. Don’t do it. Gross.

Liquids

For the liquid, I started off with orange-peach-mango juice from Trader Joe’s. It was incredibly delicious, but a little too much sugar to start off my morning. As I grew accustomed to the green-ness of the smoothies, I started cutting back on sugars. Apple juice is a good option — it’s lower in sugar and acids. These days, I usually mix about half apple juice and half almond milk. Prune juice can also be a good option if you need some natural assistance in that department — just be careful not to overdo it.

For a thickener, I always include yogurt. With that addition and the fact that I don’t freeze all my mix-ins, my smoothie comes out more like the consistency of a drinkable yogurt than a frozen smoothie. I prefer Greek yogurt since it adds more protein to my breakfast, helping me feel fuller longer and have a bit more energy. And as with the juice, I started off with vanilla or blueberry and have gradually progressed to plain yogurt, with the goal of cutting out extra sugar.

Mix-ins

Any fruit is great. Banana is the best for masking other flavors, plus it makes your smoothie a little thicker and smoother. I use pineapple with almost every smoothie. I’ve also used strawberry, blueberry, apple, and clementines — basically whatever I have laying around.

I’ve also mixed in veggies, either in addition to or instead of the greens. Carrot is a great option — it goes well with apple juice and bananas. Mixing in a few leftover turnip pieces didn’t change the flavor at all but did give it a slightly powdery, grainy texture. Beets are good too — they go well with apple and pineapple.

Keep in mind that some mix-ins will change the color of your smoothie, if that’s the sort of thing that bothers you. Mixing warm (red, orange) and cool (green, blue) colors will usually result in a brown color, which isn’t particularly appetizing. Though sometimes I just do it and drink it from an opaque cup. Mixing cool colors (greens and blueberries) will usually result in a cool blue color. Just think back to your elementary-school paint palette, and you’ll be fine.

Green smoothie

Okay, that is way more information than I thought I would share, so if that’s too much for you, here’s a recipe. Just try it. You’ll be glad you did.

Green Smoothie

1/2 cup apple juice
1/2 cup packed steamed spinach or other greens (use 1 1/2 to 2 cups if not steamed)
1/2 banana, sliced
1/4 cup pineapple chunks
1/4 cup vanilla Greek yogurt
apple juice or almond milk to taste

Blend the juice and greens together until greens are thoroughly chopped.

Add the banana, pineapple, and yogurt. Blend until smooth.

Add more juice or almond milk until smoothie reaches desired consistency. Blend well.

After you try this, experiment a little! Add whatever you have and whatever you like. That’s the beauty of a smoothie — you can’t make it wrong. Enjoy!

Linking Up With:

YOLO Mondays from Still Being Molly and Lipgloss and Crayons
Monday Meet Ups from Covered in Grace
Market Yourself Monday from Sumo’s Sweet Stuff
Your Great Idea Link Party from Or So She Says
Time for a Party from Fine Craft Guild
Made by you Monday from Skip to my Lou
Make Something Monday from Sarahndipities

Sweet Potato Fries

11 Mar

Yep, I said sweet potato fries. Oh my goodness, these were so delicious. They were so good, I made another batch 2 days later! We had some sweet potatoes from this week’s CSA, so this seemed like a great way to use them.

I had never used my mandoline before, so I decided to give it a try. It wasn’t quite as easy to use (or as easy to clean!) as I hoped it would be, but it still worked great. It sliced up my potatoes to a pretty consistent size and left a nice ridged surface for salt and pepper to hold on to. If you have one, use it, and then make your husband clean up afterward. But if not, just slice your potatoes thinly.

The recipe below is a very loose outline. Since everyone likes their fries with different flavors and textures and degrees of crispiness, make it your own. We enjoyed ours lightly salted, slightly crispy, and served alongside a super yummy veggie burger. Don’t forget the ketchup and the barbecue sauce!

Fries

Baked Sweet Potato Fries

Sweet potatoes
Olive oil or grapeseed oil
Salt & pepper

Preheat the oven to 425 F. Slice the sweet potatoes in thin rounds. Spread in an even layer on a baking sheet.

Pour a small amount oil over the potatoes. Toss until potatoes have a light, even coating. Sprinkle with salt and pepper to taste.

Bake at 425 F for 35-45 minutes or until potatoes reach desired crispiness.

Or chips?


Linking Up With:

YOLO Mondays from Still Being Molly and Lipgloss and Crayons
Monday Meet Ups from Covered in Grace
Market Yourself Monday from Sumo’s Sweet Stuff
Your Great Idea Link Party from Or So She Says
Time for a Party from Fine Craft Guild
Made by you Monday from Skip to my Lou
Make Something Monday from Sarahndipities

Kale & White Bean Soup

18 Feb

I was a little skeptical about a kale soup. It sounded just a little too… healthy. But I ended up loving this.

Each week when we receive our CSA, the nonprofit who provides it highlights an ingredient and a recipe for that ingredient. This week was kale, which I found out is rich in antioxidants and vitamins K, A, and C.

Since I had a ton of greens (it’s that time of year!), I decided to go ahead and try out the kale and white bean soup recipe that the CSA people shared with us. I followed the instructions but halved the amount.

Kale & Bean Soup

I thought it was a very delicious soup, especially when I dipped a hunk of baguette in it. It has a vegetable Italian -ish flavor, maybe kind of like a minestrone. And it didn’t occur to me until after I made it, but this dish is both vegan and gluten-free, so if you have dietary restrictions, this is a great option. Though if you want to substitute chicken broth for the vegetable broth, you certainly could.

I added in a tablespoon of flax seed, which adds fiber and serves as a thickener. It’s not necessary though, so if you’re not into it, just leave it out.

The recipe called for white beans, and had I planned on making a trip to the grocery store, I probably would have used white beans, Great Northern, cannelini, or something like that. But since I had everything else and didn’t want to go out, I just substituted garbanzo beans (chickpeas). You can use whatever variety of beans you prefer.

I had a big bowl of it for dinner, and there’s probably enough left for 2 or 3 more bowls.

Buon appetito!

Buon appetito!

Kale & White Bean Soup from Community Nutrition Partnership

1/2 Tablespoon olive oil
4 garlic cloves, minced
1/2 onion, chopped
2 cups kale, chopped
2 cups vegetable stock
1 can white beans
2 tomatoes, diced
1 teaspoon Italian seasoning
1 Tablespoon flax seed (optional)
salt and pepper, to taste

Heat oil in a large stock pot. Add garlic and onion; saute until fragrant. Add kale and stir frequently until wilted.

Add about half the broth and half the beans. Also add all of the tomatoes, seasoning, salt and pepper. Simmer 5 minutes.

Meanwhile,  use a blender, food processor, or fork to mix the remaining broth and beans until smooth. Stir into soup to thicken. Simmer 15 minutes. Serve hot.

Linking up with:

YOLO Mondays from Still Being Molly and Lipgloss and Crayons
Monday Meet Ups from Covered in Grace
Market Yourself Monday from Sumo’s Sweet Stuff
Your Great Idea Link Party from Or So She Says

Slow Cooker Sausage & Peppers

28 Jan

This past weekend I helped with the decorations and planning for my future sister-in-law’s bridal shower. I had a lot of fun doing the decorations, and I’m going to be crafting even more for the wedding in April. I will definitely share some of the projects at some point, though I’m making no promises on the timeline.

For the shower, we did a potluck, and everyone brought very delicious food. I’ll share a few recipes as I get them. This one’s short and simple, from my momma. She made a delicious sausage dish. It works equally well on a potluck table as it does for a main meal. When we walked in to set up the decorations, I could smell it cooking in her crockpot.

I was about to say “delicious and warm for a wintery night!” But I remember having simple dishes like this in the summertime, when we were off from school and too busy doing fun things to cook. Sausage and fruit salad and chips were a great summer meal when I was growing up. So I guess… it’s good all year round!

Slow Cooker Sausage & Peppers

Sausage and Peppers
1 pound sweet Italian sausage links
1 large onion, sliced
2 red bell peppers, sliced
1 small can diced tomatoes
Cut sausage into bite size pieces and brown in a skillet. Combine everything in a slow cooker and cook on low for 4-6 hours or high for 2-3 hours.

 
Linking up with:

Microwave Chocolate Pecan Toffee

24 Dec

It’s Christmas Eve! For those of you who celebrate Christmas, I hope you’re ready to enjoy a wonderful day. I have kind of mixed results on my holiday preparedness this year. I had most of my gift shopping done early, but we didn’t decorate our place at all. Once it got close to the holidays and we still hadn’t done anything, the BF and I agreed that it was kind of silly to put a lot of effort into decorations when it’s just the two of us here and we’ll be spending much of our holiday time at our parents’ houses. So instead of going all out, I just put little tiny star ornaments on our bamboo plant. That works, right?

O Christmas Bamboo O Christmas Bamboo...

All I have left to do is bake! Today, I’ll definitely be making a couple apple pies — one for each family’s house — and the apple cinnamon baked oatmeal. After I talk to my brother and sisters, that plan might be slightly expanded. After all, it’s not Christmas without coconut balls.

If you still need something to add to your family’s dessert table or something to take to a holiday party, try this amazing toffee. It’s super easy, so you’ll be able to get it done in between wrapping those last-minute presents and blow-drying your hair.

The only thing better than a delicious candy recipe is an easy delicious candy recipe. I had never made toffee before, and for some reason, I had it in my head that it’s a difficult thing to make. But it wasn’t at all. It was actually super simple. And DELICIOUS. Toffee is kind of like a hard caramel. Yum!

YUM

Somehow this recipe came to me through a long chain: a friend of the stepmom of an ex-boyfriend of a friend. So who knows where it first came from, but I’m glad it arrived in my inbox.

I made a few batches of toffee as gifts for volunteers who helped out with a big work event. It was quick and easy:

Microwave all the toffee ingredients together.

Step 1

Pour it on a pan and spread the chocolate chips over top that.

I have no idea what's up with that weird shadow.

Let it cool/harden, and then break it up into bite-sized pieces.

DONE

I packaged them up in cute little boxes that I got from AC Moore and tied some ribbon around them. Adorbs.

Packages tied up with string...

The only downside to this recipe is that it can get a little expensive. It doesn’t really make a ton of toffee, especially if you’re trying to fill a box, so I had to make quite a few batches. With butter, chocolate, and nuts… not the cheapest.

But it’s so delicious and good-looking, it makes an excellent gift. After I packaged all the pieces up, I collected all the leftover little pieces that were too small to load into the boxes, chopped them up even smaller, and packaged them in a jar as Toffee Crunch Ice Cream Topping. Yum!

Toffee Crunch Ice Cream Topping... It's a little frosty from the fridge, but dang if I'm not craving a bowl of ice cream now.

Well, all that’s left is the recipe. Hope you enjoy it. Happy Holidays!!

Microwave Toffee with Chocolate and Pecans

1/2 cup finely chopped pecans
1 cup (2 sticks) butter
1 cup sugar
1 teaspoon salt
1/4 cup water
1 cup semisweet chocolate chips

Coat the sides of a large mixing bowl with butter and place the remaining butter in the bowl. Add sugar, salt, and water; do not stir. Microwave on high for 11 minutes or until mixture begins to turn light brown. Pour onto a greased cookie sheet.

Sprinkle chocolate chips over the toffee and let stand 1 minute. Spread chocolate over the toffee to form a melted layer, and sprinkle with pecans. Chill until firm.

Break into bite-size pieces. Package or serve. Yields about 1 pound.

Delicious delicious toffee

Linking up for:

Citrus-Fennel Quinoa with Chickpeas

15 May

I made the healthiest dinner last night, and with all the citrus in there, it must have been jam-packed with vitamin C. And good thing – the BF was sick 2 weeks ago, then I was sick, and now he’s sick again. We apparently could both use a vitamin boost. As with most of my dinners, I found this original recipe online from thekitchn.com, and then I edited based on my own tastes. And also based on what I had on hand and what was cheapest at the grocery store. Instead of the original couscous, I swapped quinoa, since I already had some of that. And instead of lemon and orange, I went with lemon and lime, because those were on sale at the store. I made a couple other small edits here and there.

I started off with one lime and one lemon. I used a microplane to zest each of them and added that into a medium sauce pan. Then I juiced the lemon and one half of the lime into a large measuring cup. If you don’t have one, try this handy citrus press from Pampered Chef – it’s amazing. If you don’t have anything fancy to really get all the juice out, you may want to add another lime or lemon. I topped off the juices with enough water to make 1 1/2 cups liquid and added that to the sauce pan. I finished it with 1 tablespoon olive oil and about 1/2 teaspoon salt and cooked over high heat. Once it started boiling, I poured in 1 cup quinoa, covered the pan, and reduced the heat to a simmer. Keep an eye on it and make sure it doesn’t dry out.

I heated 2 tablespoons olive oil in a large skillet over medium heat. I added 2 cloves minced garlic and 1 fennel bulb, cut into matchsticks (about 1 inch long, 1/4 inch thick). I cooked those about 10-15 minutes. Then I added 1 can (15 oz) drained chickpeas and the juice of half a lime. The original recipe calls for 1/2 teaspoon ground coriander, but I didn’t have any, so instead I added about 1/4 teaspoon “French herb blend” and 1/4 teaspoon lemon garlic blend. But just add whatever you have that sounds good. Last, I finished it off with a couple handfuls of baby spinach. As soon as the spinach cooks down, it’s ready!

What did the Garbanzo say to the waiter? "Chick, peas."

Similar to rice, the quinoa is ready when the water is absorbed. If you’re ready to serve and there’s too much water, let it cook for a few minutes with the lid off. I served the chickpea/fennel blend overtop the quinoa and it was subtly delicious. If you’re looking for a kick-in-the-mouth flavor, go somewhere else. But if you want to appreciate subtle flavors delicately balanced throughout your meal, this is it. Also, this is super healthy, unlike the block of cheddar cheese I’m currently snacking on.

Dinner time!

We enjoyed some tzatziki sauce and pita bread as a little side dish. As a side note, I figured out a super easy way to enjoy this Greek yogurt dip whenever I feel like it. I ordered tzatziki seasoning blend from Wildtree, a company that sells all-natural foods through a Pampered Chef-style set up. You only have to use a little at a time, so it lasts forever – well worth the price. Then I buy individual servings of plain Greek yogurt, like Oikos or Chobani, which is a perfect size for just two people. Before I start dinner, I cut up half a cucumber in tiny teeny pieces, mix it into the yogurt with a teaspoon or two of the seasoning blend, and then it’s ready. It’s delicious and it’s the perfect amount. A lot of the pre-made or store-bought versions are too big, and I usually don’t finish them before they go bad.

Gotta get some Vitamin C up in here

Anyway, the meal was great. I will probably add it to my list of stand-by meals. I thought it was pretty easy to whip up on a weeknight. Bon appetit!

Citrus-Fennel Quinoa with Chickpeas adapted from theKitchn

zest and juice of 2 limes, divided
zest and juice of 1 lemon
olive oil, divided
1 cup quinoa, rinsed well
2 cloves garlic, minced
1 fennel bulb, cut into matchsticks (~ 1″ long, 1/4″ thick)
1 can (15oz) chickpeas, drained
1/2 teaspoon ground coriander
2 handfuls baby spinach

Add the lime zest, lemon zest, 1 tablespoon olive oil, and 1/2 teaspoon salt to a medium sauce pot. In a large measuring cup, combine the juice of 1 lemon and the juice of 1 lime. Add enough water to make 2 cups total liquid. Pour the liquid into the pot and cook over high heat. Once boiling, add 1 cup quinoa, cover, and reduce to a simmer. Cook about 20 minutes; fluff with a fork and set aside.

Meanwhile, heat 2 tablespoons olive oil in a large skillet over medium heat. Add garlic and fennel; cook 10-15 minutes.

Add chickpeas, the juice of one lime, and coriander. Stir well. Add the spinach and cover, stirring occasionally. Cook 5-10 minutes, or until spinach is wilted.

Serve over quinoa.

Free Dinner!

14 Mar

This isn’t a nice recipe or anything, but I was just super impressed with my own economical dinner skills tonight and thought I’d share.

I got home late from a meeting, the BF is still out, and I was starving. I was doing my typical stand-in-front-of-the-open-fridge-and-hope-something-tasty-magically-appears. And in my head, I heard my dad yelling, “Shut the door!” (Everyone’s dad yells that, right?) But then something magically did appear: an idea. (Oh so cheesy, I know. Apologies.)

From the top shelf: Leftover bhindi (okra) masala from going out to Tandoor Indian last night (Yum!). The BF already ate the chicken tikka masala, so there wasn’t enough left for a meal.

From the way back of the middle shelf: Leftover brown rice from last weekend’s salmon lunch.

From the bottom shelf: Leftover baked chicken a friend sent home with the BF when I couldn’t make it to dinner this weekend.

From the drawer: Leftover asparagus spears, also from the salmon lunch.

Each on its own, certainly not enough for a meal. But together – perfect! I just finished, and it was delicious, easy, and free. Yay for no waste!

Leftovers Dinner

And for dessert… coconut chocolate chip oatmeal cookies leftover from a visit to a friend this weekend!

C is for Cookie!