Tag Archives: tomato

Cheesy Spinach Tomato Pie + A Giveaway!

2 Dec

I won’t lie, I occasionally listen to Christmas music throughout the year. So it would be incorrect to say that now that Thanksgiving has past, I’m finally getting to listen to my fave holiday jams. What would be more correct is to say that I am finally getting to listen to my fave holiday jams without hiding it. I can put on my Happy Christmas! playlist in the car, and the BF will (somewhat reluctantly) allow it. It’s a very exciting time of year for me.

My dear friend Eleanor gave me my Christmas present already: this beautiful pie pan. She knew I would be baking for Thanksgiving, so she gave it to me early!

Pie Pan
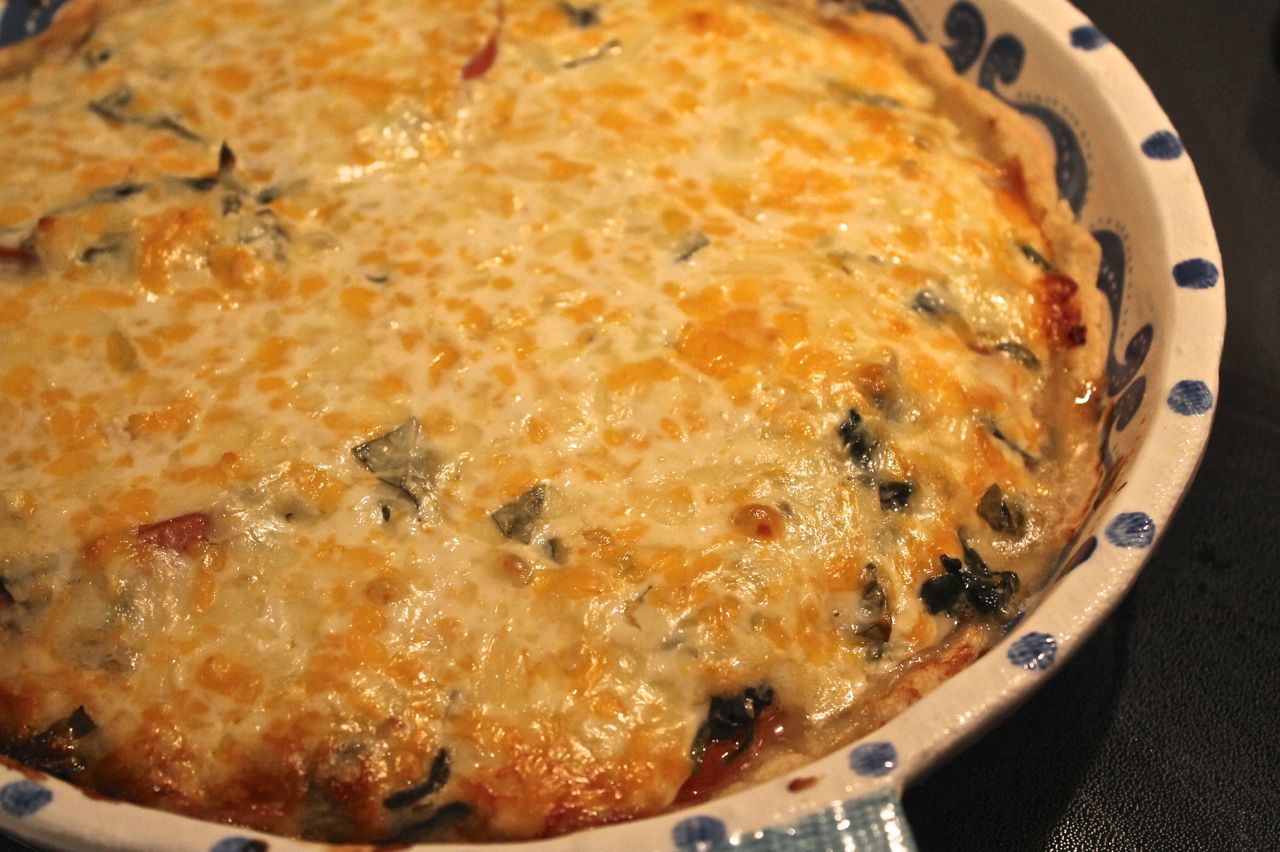
I’ve already used it for my Secret Recipe Apple Pie and this oh-so-amazing, super delicious, completely to-die-for tomato pie. I’m not kidding: this is one of the best meals I’ve ever made. Our dinner conversation primarily revolved around how delicious it was and how this will definitely be a dish to serve for casual dinner party guests. The BF and I each had thirds, which is amazing for us light eaters. And I may or may not have had some for breakfast the next day.

Here are the star players: Ingredients

It’s really not complicated, though maybe a little time consuming, but totally worth it. After the crust is ready, just add your layers… sliced tomato, fresh basil and sauteed spinach, and then cheese!

Layers

I edited a more classic recipe a bit to include spinach (I figured I needed something healthy to counter all that cheese) and to substitute Greek yogurt for mayonnaise (I’m not a fan of mayo, so we never have any in the house). I tried to squeeze extra water from both the tomatoes and spinach, and it still came out a bit soupy, so maybe I’ll use my cheesecloth next time and try a bit harder. But not to worry — even a little runny, it didn’t stop us from enjoying our third helpings!

Cheesy Spinach Tomato Pie

And in the spirit of Christmas and delicious cheesy tomato pies, here’s my first-ever Giveaway! Enter to win this cute little Clinique gift set.

Clinique Gift Set

Gift set includes:

  • 7-Day Scrub Cream Rinse-Off Formula
  • Dramatically Different Moisturizing Lotion
  • Clinique Eye & Cheek Colour Compact: Colour Surge Eye Shadow Duo in Pink Slate, Soft-Pressed Powder Blusher in New Clover, and True Bronze Pressed Powder Bronzer in Sunkissed
  • Long Last Lipstick in Bamboo Pink
  • Brush Set
  • Matching large and mini cosmetics bag

* Does not include mascara shown in picture

There are a few ways to enter – the more ways you enter, the better the chance you have at winning – so make sure you comment once for each of the following things you do:

  • Favorite the new Wine & Plum Etsy shop! Favorite 1 item in the Wine & Plum Etsy shop, and comment below to share which item you would like to give or receive for Christmas!
  • Bonus: Follow Wine & Plum on Pinterest! Pin your favorite Wine & Plum recipe or Etsy shop item to one of your Pinterest boards, and share the link to your pin in a comment below.
  • Bonus: Follow Wine & Plum on Instagram and tag 3 friends on my Instagram giveaway post.
  • Bonus: Follow Wine & Plum on Twitter, and tweet about this giveaway: Excited about this delicious Cheesy Tomato Pie #recipe plus an awesome #Clinique #giveaway from @wineandplum! http://bit.ly/1fYGSw8
  • Bonus: Like Wine & Plum on Facebook, and share any post from the W&P Facebook page.

Don’t forget to leave a comment for those bonus submissions!

Now, here’s the recipe for the Tomato Pie! If you make it, come back and let us know how you liked it!

Mmm... cheesy

Cheesy Spinach Tomato Pie adapted from Simply Recipes

Crust:

1 1/4 cups all-purpose flour, plus extra for rolling
1/2 teaspoon salt
1/2 teaspoon sugar
1/2 cup (1 stick) unsalted butter, cold, cut into 1/4″ cubes
3 tablespoons cold water

Preheat the oven to 350 F.

Combine all ingredients in a large bowl. Mix well with your hands, kind of like kneading, until all ingredients are incorporated. Shape dough into a ball.

Flour your working surface and turn out dough with a floured rolling pin, making a large circle. Transfer crust to a pie pan and press evenly into the dish.

Bake the pie crust for about 8-10 minutes.

Pie:

1 tablespoon olive oil
2 garlic cloves, chopped
3-4 tomatoes, sliced
2 large handfuls spinach
1/4 cup sliced basil (about 7-8 leaves)
2 cups grated cheese (Any combination of your favorite cheese; I suggest mozzarella and cheddar. In ours, we ran out of mozz so substituted havarti, which was delicious)
3/4 cup plain Greek yogurt
Salt and pepper

Place the tomato slices in a colander and sprinkle some salt over them; allow to drain while preparing the rest of your ingredients.

In a large bowl, mix together the cheeses and yogurt; set aside.

Heat the olive oil in a large skillet. Add the garlic and cook until fragrant, about 3 minutes. Add the spinach and stir well, coating leaves with olive oil. Cook until spinach is wilted, only 3-4 minutes. Set aside.

Once the pie crust has baked for about 8-10 minutes, remove from oven and assemble pie. Pressing each slice between paper towels to remove excess liquid before placing, arrange tomato slices in a circle in the bottom of the pie pan. Sprinkle the basil on top of the tomatoes. Squeeze spinach in paper towels or cheesecloth to remove excess liquid and then arrange evenly in the pan. Last, spread the cheese mixture evenly over top of the entire pie.

Bake until the top of the pie is golden brown, anywhere from 25-45 minutes.

Linking Up With:

Funday Monday from Still Being Molly
Block Party from Sumo’s Sweet Stuff
Made by you Monday from Skip to my Lou
Inspiration Monday from Twelve O Eight
Time to Sparkle from Love Grows Wild
Wonderful Food Wednesday from All She Cooks
Create It Thursday from Lamberts Lately
Full Plate Thursday from Miz Helen’s Country Cottage
All Things Pretty from Sparkles and a Stove
Foodie Friday from Simple Living & Eating

Advertisement

Grilled Cheese & Guacamole

1 Jul

My aunt/godmother tells me this story of the first time I met her now-husband, my uncle John. I was 5, and we were out to dinner somewhere. I ordered a grilled cheese, which was always my favorite. He asked me if I liked it, and apparently I responded, with complete sincerity and gravity, “I love grilled cheese so much, if I didn’t have it at least once a week, I would die.”

Let me tell you, ain’t nobody better get between me and some cheese. I don’t play around. As a tween, the first thing I learned how to make on my own was Kraft macaroni and cheese, and the second was a perfect grilled cheese. I don’t think you can expand much on a perfect grilled cheese — Bunny bread, Kraft singles, and Country Crock — but you can have other perfect grilled cheeses.

See, to me, fancy grilled cheese — like the $10 ones you can get at locavore foodie restaurants — are really good, but they’re pretty much a different food altogether. I will very much enjoy a fancy grilled cheese, but if I’m craving a perfect classic grilled cheese, a fancy one just won’t fill that craving. I feel the same way about delivery pizza versus gourmet pizza. That’s why it’s perfectly acceptable to go out to Pizzeria Toro for gourmet pizza and to order from Papa John’s for delivery pizza all in the span of a couple days — they’re totally different meals.

I didn’t have much in the fridge last week, and I was super hungry for dinner. We had had this delicious Country loaf from Bread & Butter with butter and raspberry jam for breakfast:

Good morning!

Mmm… it was so delicious and still warm! So with the second half of the loaf, I decided to make a grilled cheese for dinner. And then I remembered that I had seen this on Pinterest. Seemed like a no-brainer.

The major difference between my Grilled Cheese & Guacamole and the one on Cooking Stoned is that mine is not as pretty. This is not surprising to me. The other thing I did was dice my tomatoes and mix them into my guacamole instead of having slices of tomato. I just don’t like raw tomatoes all that much. It would be good either way. An important part of the process that I learned from Cooking Stoned, is to broil or toast the bread with cheese first so that the cheese gets all melty.

Cheesy Melt!

(I don’t know why there’s only one piece of bread in that picture. I cooked both slices that way. Whatever.) Ooey gooey deliciousness:

Gooey deliciousness

Talk about a grown-up grilled cheese. OMG YOU SHOULD ADD BACON. I’m going to do that next time.

Here’s a recipe. I didn’t really use amounts because sandwiches are one of those things where you should just put however much you want to on the bread.

Guacamole Grilled Cheese Sandwich adapted from Cooking Stoned

2 slices of bread
guacamole
handful of grape tomatoes or a few slices of a regular tomato
cheddar slices
butter
(onion and/or cilantro might be a good idea, but I didn’t use those)

Prepare the guacamole. (I use an avocado, lime juice, and Wildtree guacamole seasoning. You could also purchase prepared guac.) Dice the tomato and stir into the guacamole. Set aside.

Arrange slices of cheddar cheese on the surface of both slices of bread. Broil or toast until the cheese is melted and the bread is slightly crispy.

Melt 1/2 tablespoon butter in a pan over medium heat. Transfer a slice of cheesy bread to the pan, spread on a whole bunch of guacamole, and then sandwich the other slice of cheesy bread on top. Flip the sandwich when the bread is golden brown, only a couple minutes on each side.

ENJOY IT.

Linking Up With:

Funday Monday from Still Being Molly and Lipgloss and Crayons
Market Yourself Monday from Sumo’s Sweet Stuff
Made by you Monday from Skip to my Lou
Anything and Everything Blog Hop from My Thrifty Chic
Time to Sparkle from Love Grows WildInside BruCrew LifeThe Recipe Critic, and The Gunny Sack
Link Party Wednesday from Lil’ Luna
Create It Thursday from Lamberts Lately
All Things Pretty from Sparkles and a Stove and My Fashion Forward Blog
Link Party Thursday from Somewhat Simple

Curry Coconut Vegetable Stew

17 Jun

Oh my goodness, y’all, so I finally got around to finishing this last season of Revolution, and let me just say, after those last 10 minutes, my mind = blown. I almost gave up on that show because I thought the middle part of the season was getting kind of lame, but it really picked up there at the end. And that last scene? Whaaat? I don’t even know what to think.

Okay, Revolution is not at all related to this recipe, but I just had to get that out of my system. I don’t know anyone who watches that show, so I never get to talk about it. Onto the stew!

I had a ton of veggies in my fridge, and not much else. And I was looking for something easy, so what better than a soup? The thing I love about soups is that they’re easy to customize based on preference and available resources. Don’t like greens? Leave ’em out. Got zucchini but no squash? Whatever, that’s fine.  If you stick to similar weights/amounts, and then just use whatever suits you, you’ll be fine. And actually, I used chicken stock instead of vegetable stock, just ’cause that’s what I had.

Mmm... Stew

This is a really hearty stew. The rice and beans definitely fill you up. But the coconut curry flavor keeps it light enough to eat year-round. And it’s super healthy too. The coconut and curry flavors are delicious and definitely noticeable, but not so strong that you don’t still taste the vegetables themselves. You definitely want to stick with fresh vegetables, for that reason. Don’t bother with canned or frozen — just use whatever’s fresh in season.

You can’t really see it in the picture, but there’s definitely some liquid down in the bottom there. It’s soup-y the first go-round, and thickens up to more of a stew texture when eaten as leftovers. Both are equally delicious. As you’re cooking, try to keep the lid on the pot as much as possible so you don’t lose too much liquid. That way, at the end, if it’s too runny, you can simmer with the cover off for a little while to reduce it. But it’s hard to go the other direction.

Don’t forget that when it’s ready, you have to shout, “Soup’s on!” :)

So many veggies!

Curry Coconut Vegetable Stew

1 Tablespoon olive oil
3 Tablespoons garlic, minced
3 1/2 cups vegetable stock
3/4 cup white basmati rice
3/4 lb potatoes, diced
1/4 lb carrots, sliced
1 Tablespoon curry powder
salt and pepper
1 tomato, diced
1/2 lb squash, sliced
1/2 lb zucchini, sliced
1/2 lb green beans, ends removed and cut into 1″ pieces
1/4 lb greens (chard and kale)
1 can black beans, drained and rinsed
1 can light coconut milk

Heat the olive oil in a large stockpot over medium heat. Add the garlic and cook until fragrant, about 5 minutes. Add the stock and bring to a simmer.

Add the rice. Cover and cook for 8 minutes.

Add the potatoes and carrots. Cover and cook for 5 minutes.

Stir in the curry powder, salt, and pepper. Add the tomato, squash, zucchini, and green beans. Cover and cook for 8 minutes.

Add in the greens. Cook, stirring occasionally, until wilted.

Stir in the black beans and coconut milk. Cook until heated through. Serve hot.

Soup's On!

Linking Up With:

Funday Monday Link-Up from Still Being Molly and Lipgloss and Crayons
Market Yourself Monday from Sumo’s Sweet Stuff
Made by you Monday from Skip to my Lou
Anything and Everything Blog Hop from My Thrifty Chic
Time to Sparkle from Love Grows WildInside BruCrew LifeThe Recipe Critic, and The Gunny Sack
Create It Thursday from Lamberts Lately
All Things Pretty from Sparkles and a Stove and My Fashion Forward Blog

Mini Party Quiches

20 Nov

Can you tell we like things mini? Mini things are so cute!

Last weekend my family and I threw a surprise party for my Dad’s 50th birthday. Once I got my baking assignments, I called Betsy, and we got together that morning to put together a couple dishes. We made a simple blueberry cobbler, but the mini quiches were the highlight, and we made a TON of them. Quadrupling the recipe may have been a little overboard — there were plenty leftover — but we wanted to be prepared. We made two different varieties: a bacon cheddar quiche and a spinach, tomato, and swiss quiche. Deelish!

We began by mixing up the fillings and setting them aside.

  • For the bacon cheddar: Betsy cooked up 10 slices of bacon, let them cool, and then crumbled them up. I mixed 1 8-oz block softened cream cheese, 4 T milk, 4 eggs, and 2 T dried garlic flakes into a large bowl, and beat it with an electric mixer on low until it got relatively smooth. I stirred in 2 cups grated extra sharp cheddar cheese and set the bowl aside. The bowl of cheese mush looked pretty disgusting, especially sitting next to a plate of bacon bits.
    Milk, eggs, and cheese... yum!Gross Cheese Mixture
  • For the SpinTomSwiss: I chopped up 1 1/2 hot house tomatoes and a couple handfuls of spinach and set them aside. Then I mixed 2 8-oz blocks softened cream cheese, 2 T milk, 4 eggs, and 2 T oregano into a large bowl, and beat it with an electric mixer on low until it got relatively smooth. I stirred in 1 cup grated swiss cheese and set the bowl aside. This one looked disgusting too.

Now for the tricky part. We greased some mini muffin pans and set them out. I un-popped a tin of crescent rolls, spread them on the counter, and mushed the scoring lines back together so it would be one big square instead of divided into the triangles. Betsy used a circle cookie cutter and cut round pieces of dough that I shaped into the mini muffin pan.Cutting DoughWord to the wise: Leave the dough in the fridge as long as possible before you take it out, and work quickly with the dough once you open the tin. The dough seizes up really quickly. We tried to roll out the leftover dough and cut it again, and it was REALLY hard. The dough becomes really elastic, so when we tried to spread it into the muffin tin, it just shrunk back up on itself. If you have an extra couple dollars to spend, I recommend just buying a couple extra tins of crescent rolls and tossing the old dough. We re-used a little bit of the dough, then got frustrated and threw it out. So in the end, it took about 3 tins of crescent rolls to make the base for 48 mini quiches.

Dough Cups
So once we lined all the muffin tins with dough, I filled them up.

  • Bacon Cheddar:  Sprinkle bacon in the bottom of each quiche cup. Fill each cup with about 1 tsp of the cheddar mixture. Sprinkle a couple more pieces of bacon on top. (This just makes it easier to identify what it is, which is nice visually, but also is important if you have any vegetarians in your crowd.)
    Mmm... bacon cupsBubbling Bacon Cheddar Quiches
  • SpinTomSwiss: Sprinkle tomato and spinach pieces in the bottom of each quiche cup. Fill each cup with about 1 tsp of the swiss mixture.
    Spinach and Tomato CupsBubbling Spinach Tomato & Swiss Quiches

Bake on 375 F for 10-12 minutes. The bread edges of the quiche will start to turn a golden brown, and the tops might get a little bubbly.
Golden Brown Edges

They’re so cute! The bacon cheddar is a nice golden yellow color, and the SpinTomSwiss is more of a white color.

Mini Party Quiches!

How Sue Sees It:

  • The most difficult part of this is definitely working with the dough. If you want them to look nice, like if you’re serving them at a party, then don’t worry about re-using the dough. Just buy extra, toss the leftover dough, and don’t worry about it. But if you care more about taste than looks, just cram the dough down there however you can. Even if the dough kind of sits on the bottom and doesn’t make a cup, the dough will still rise and the egg mixture will stiffen enough that it will still hold a firm muffin shape.
  • And don’t worry too much about over-filling the cups either, unless you’re going for a nice uniform look. It will still hold a muffin shape.
  • Take some time to experiment with your own flavors! The original recipe I found called for bacon and swiss, and I just modified the recipe a bit more to our crowd’s tastes. As long as you preserve the basic egg and dairy components, you can add or substitute pretty much whatever else you want in there.

Betsy & Susie