Tag Archives: coconut

Dairy-Free Chocolate Mousse

15 Jul

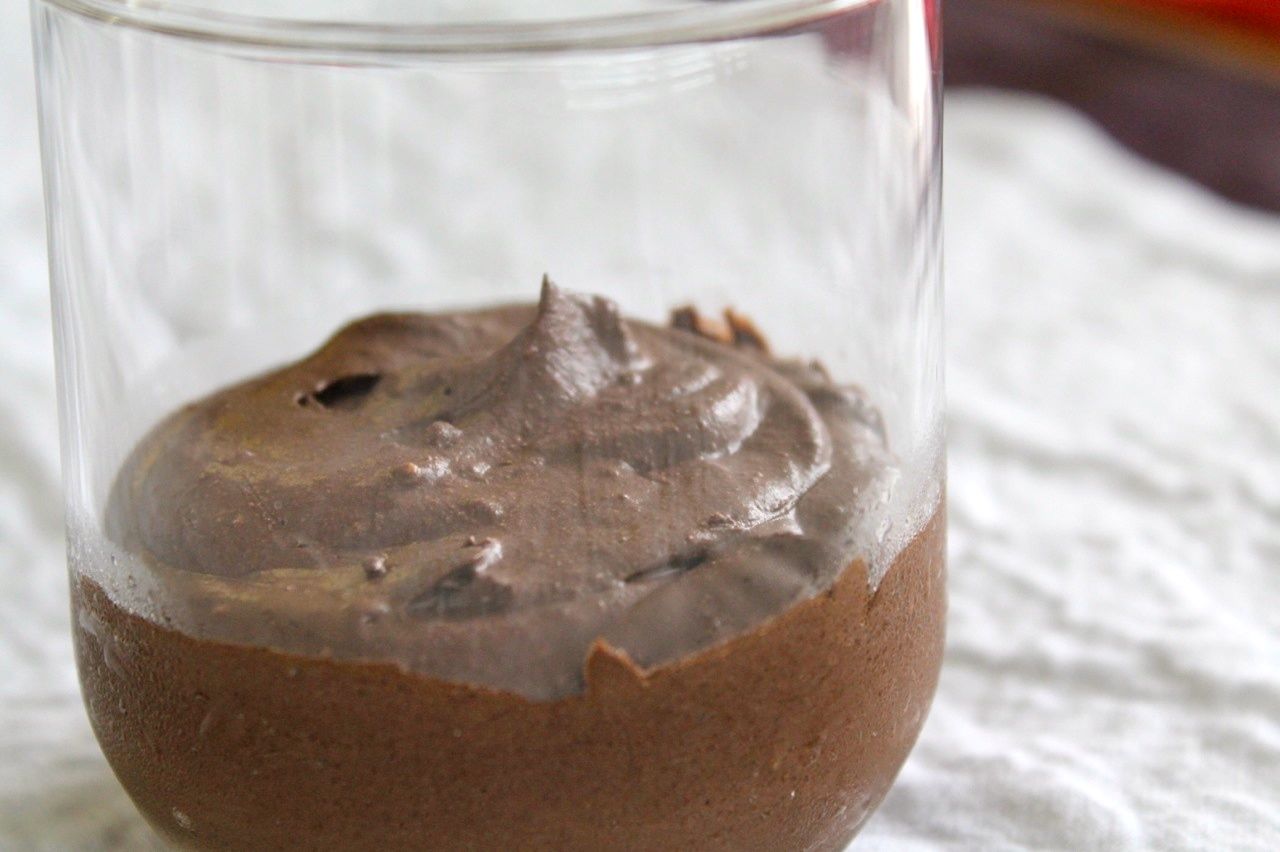
Mmm this is so delicious. Maybe not quite as delicious as the Best Chocolate Mousse Ever, but still pretty incredible. I have a friend who is both gluten-free and dairy-free, so coming up with a dessert that fit those parameters was difficult – I mean, I bake, right? But I was so excited for this amazing find. So simple, so quick, and so tasty.

IMG_2002

As long as you remember to refrigerate the coconut milk in advance, this only takes about 5 minutes to put together. Plus, mousse is like grown-up pudding. It’s as delicious and creamy as a Snack Pack, but super classy. To make it even classier, serve it out of something ridiculous like a martini glass or something a little less ridiculous like a stemless wine glass. And then when everyone’s done, bring out the bowl and mixing spoons and let people lick them clean. Classy.

For my mousse, I used a combo of regular Hershey’s cocoa powder and Special Dark Hershey’s cocoa powder. I haven’t tried it, but I imagine spending money on some high-quality cocoa powder would be worth it. There’s not a ton of sugar in this recipe, so unless you like really dark chocolate, be careful using too dark chocolate.

Also, need a good way to use the leftover coconut water? Try using it as the liquid base in smoothies! Super tasty with banana and pineapple.

Okay, go try this! It’s super easy to get a delicious, smooth, creamy, chocolate-y with a slight hint of coconut dessert that’s not too terribly unhealthy for you. I might just leave a can of coconut milk in the back of the fridge for whenever I need a quick chocolate fix.

Mmmousse

Dairy-Free Chocolate Mousse from The Urban Poser

1 cup full fat (canned) coconut milk, cream only (takes about 2 cans)
4-5 tablespoons cocoa
3 tablespoons honey or vegan alternative or stevia, to taste
1 teaspoon vanilla

Chill your cans of full-fat coconut milk in the refrigerator overnight.When ready to make the mousse, open up the cans and scoop the thick coconut cream into a large bowl, leaving the liquid behind. Add the rest of the ingredients to the bowl and beat the mixture for 2-5 minutes.Serve. Excellent with strawberries, raspberries, etc.

Linking Up With:

Funday Monday from Still Being Molly and Lipgloss and Crayons
Market Yourself Monday from Sumo’s Sweet Stuff
Made by you Monday from Skip to my Lou
Anything and Everything Blog Hop from My Thrifty Chic
Time to Sparkle from Love Grows WildInside BruCrew LifeThe Recipe Critic, and The Gunny Sack
Link Party Wednesday from Lil’ Luna
Create It Thursday from Lamberts Lately
All Things Pretty from Sparkles and a Stove and My Fashion Forward Blog

Advertisement

Curry Coconut Vegetable Stew

17 Jun

Oh my goodness, y’all, so I finally got around to finishing this last season of Revolution, and let me just say, after those last 10 minutes, my mind = blown. I almost gave up on that show because I thought the middle part of the season was getting kind of lame, but it really picked up there at the end. And that last scene? Whaaat? I don’t even know what to think.

Okay, Revolution is not at all related to this recipe, but I just had to get that out of my system. I don’t know anyone who watches that show, so I never get to talk about it. Onto the stew!

I had a ton of veggies in my fridge, and not much else. And I was looking for something easy, so what better than a soup? The thing I love about soups is that they’re easy to customize based on preference and available resources. Don’t like greens? Leave ’em out. Got zucchini but no squash? Whatever, that’s fine.  If you stick to similar weights/amounts, and then just use whatever suits you, you’ll be fine. And actually, I used chicken stock instead of vegetable stock, just ’cause that’s what I had.

Mmm... Stew

This is a really hearty stew. The rice and beans definitely fill you up. But the coconut curry flavor keeps it light enough to eat year-round. And it’s super healthy too. The coconut and curry flavors are delicious and definitely noticeable, but not so strong that you don’t still taste the vegetables themselves. You definitely want to stick with fresh vegetables, for that reason. Don’t bother with canned or frozen — just use whatever’s fresh in season.

You can’t really see it in the picture, but there’s definitely some liquid down in the bottom there. It’s soup-y the first go-round, and thickens up to more of a stew texture when eaten as leftovers. Both are equally delicious. As you’re cooking, try to keep the lid on the pot as much as possible so you don’t lose too much liquid. That way, at the end, if it’s too runny, you can simmer with the cover off for a little while to reduce it. But it’s hard to go the other direction.

Don’t forget that when it’s ready, you have to shout, “Soup’s on!” :)

So many veggies!

Curry Coconut Vegetable Stew

1 Tablespoon olive oil
3 Tablespoons garlic, minced
3 1/2 cups vegetable stock
3/4 cup white basmati rice
3/4 lb potatoes, diced
1/4 lb carrots, sliced
1 Tablespoon curry powder
salt and pepper
1 tomato, diced
1/2 lb squash, sliced
1/2 lb zucchini, sliced
1/2 lb green beans, ends removed and cut into 1″ pieces
1/4 lb greens (chard and kale)
1 can black beans, drained and rinsed
1 can light coconut milk

Heat the olive oil in a large stockpot over medium heat. Add the garlic and cook until fragrant, about 5 minutes. Add the stock and bring to a simmer.

Add the rice. Cover and cook for 8 minutes.

Add the potatoes and carrots. Cover and cook for 5 minutes.

Stir in the curry powder, salt, and pepper. Add the tomato, squash, zucchini, and green beans. Cover and cook for 8 minutes.

Add in the greens. Cook, stirring occasionally, until wilted.

Stir in the black beans and coconut milk. Cook until heated through. Serve hot.

Soup's On!

Linking Up With:

Funday Monday Link-Up from Still Being Molly and Lipgloss and Crayons
Market Yourself Monday from Sumo’s Sweet Stuff
Made by you Monday from Skip to my Lou
Anything and Everything Blog Hop from My Thrifty Chic
Time to Sparkle from Love Grows WildInside BruCrew LifeThe Recipe Critic, and The Gunny Sack
Create It Thursday from Lamberts Lately
All Things Pretty from Sparkles and a Stove and My Fashion Forward Blog

1 Cake, 3 Ways

24 Feb

I promised a cake to a friend because of a competition we held at work, and when the time came around, she wouldn’t tell me what kind of cake she wanted. But I owed it to her, so I didn’t want to back out or forget. So since I didn’t know which cake to bake for her, I just baked three.

But I thought this through. Mixing up three different batters seemed like it would take up a lot of time. Obvi. So I made up a basic batter without any flavoring, divided it into three bowls, and then added separate flavorings to each one. And while the cakes were baking, I made up 3 different fillings for each cake. And then I made one vanilla buttercream frosting to top everything off. Game plan: coconut cake with coconut cream filling and vanilla buttercream frosting, lemon cake with lemon filling and vanilla buttercream frosting, and almond cake with chocolate filling and vanilla buttercream frosting. Hells yeah.

I started by mixing up the base. I sifted together 2 1/2 cups flour2 1/2 teaspoons baking powder, and 1/2 teaspoon salt. In a separate bowl, I mixed 2 cups white sugar3/4 cup butter, and 3 eggs with an electric mixer for about 1 minute. Then I alternately mixed in the flour mixture and 1 cup milk to the sugar mixture.

3 Cake Batters

I divided this base into 3 bowls.

  • Bowl 1: I added 1 teaspoon vanilla and 1/3 cup coconut flakes.
  • Bowl 2: I added 2 teaspoons fresh squeezed lemon juice and 1/2 teaspoon lemon zest.
  • Bowl 3: I added 2 teaspoons almond extract.

With my batters ready, I baked them at 350 F in batches, as my cake pans allowed. I used Wilton’s Mini Tasty-Fill Cake Pan Set. Sounds ridiculous, but it’s cool. It makes mini cake halves with a depression in the center of each one so that when you stack them, there’s a hollow center to add filling to. Of course, if you don’t have a smaller cake pan like this, you could make cupcakes and fill those. My small cakes baked 22 minutes or so. Cupcakes would probably take 18-20 minutes, but just keep checking with the toothpick test until they’re done.

3 Cakes Baking

While my cakes baked, I made the fillings.

  • For the coconut filling, I made up a half batch of the same filling that I used in my Simpler German Chocolate Cake, except I omitted the pecans.
  • For the lemon filling, I made a slightly different version of the original recipe I found here. In a saucepan, I mixed together 2 teaspoons lemon zest2 1/2 tablespoons lemon juice, and 1 teaspoon flour. I mixed that until it was smooth, and then I added 3 tablespoons unsalted butter and 3/4 cup sugar. While I brought that to a boil, I whisked 2 egg yolks in a bowl until smooth. I put a small bit of the lemon mixture into the eggs and stirred until smooth, then I added the egg mixture to the lemon mixture, stirring well. Do this part quickly so that the lemon mixture doesn’t boil for longer than a minute or so. Then I reduced the heat to low and stirred constantly for about 5 minutes. Then I removed it from the heat and let it cool. (Note: Don’t skip the step of stirring the eggs with a small amount of the lemon mixture first. That’s so you don’t cook egg chunks into your lemon filling.) (Other Note: I thought this was a little too thick. If I made this again, I would follow the original recipe more closely. I think I had too much sugar and not enough liquid.)
  • For the chocolate filling, I melted 1/2 stick (1/4 cup) unsalted butter and 1/2 cup of a broken up Hershey’s Bar with Almonds in the microwave, stirring well every 20-30 seconds until smooth.

While my fillings cooled, I made the frosting. You can find the original recipe for Vanilla Buttercream Frosting at savorysweetlife.com.

Then it was time for assembly. I matched the cakes to their fillings and filled the center of each one. After I sandwiched them together, I frosted them all with the Vanilla Buttercream Frosting.

So that the recipient would be able to tell what’s what, I topped each with something to represent what was inside. Coconut flakes on the coconut cake, chocolate bar bits on the almond-chocolate cake, and yellow and white sprinkles on the lemon cake. I stacked them all on one cake tray, and that was that. 1 cake batter 3 ways!

3 Cakes

Simpler German Chocolate Cake

22 Jan

A couple months ago, I volunteered to bake my dad’s birthday cake. Probably his favorite dessert would be anything fruit-related, but he’s also a huge fan of German chocolate cake, which I’ve never attempted before. And he hasn’t had one for his birthday in years. According to my sister, who hates German chocolate cake, he requested it “every single year,” but I don’t remember this – must have been before I was around. I started researching recipes and wow were they complicated. Most included buttermilk and a complicated process, and I didn’t intend to go to the grocery store or work that hard. So maybe this isn’t an authentic German chocolate cake, maybe I took a few shortcuts, but it’s still pretty awesome.

I decided to save a little time by going with a cake mix but a scratch-made frosting and filling. I started by making a chocolate cake according to its package directions. I baked it in a 9″ springform pan so that the sides would be straight up and not slanted, easier for slicing and stacking into layers. Since I did the entire batch in one pan, it took about 40 minutes to bake. If you did two 8″ rounds, it would bake faster, and you wouldn’t have to worry about slicing. Just fyi.

While it baked, I worked on the frosting/filling. I separated the yolks of 3 eggs and added them to a medium saucepan. (I saved the whites for breakfast the next day.) I added in 1/2 cup white sugar1/2 cup packed brown sugar, 1/2 cup butter, 1 cup evaporated milk, and 1 teaspoon vanilla. I stirred everything up well and then turned on the stove to medium heat. I recommend stirring things well before you turn the heat on and continuing to stir well, because I had some issues with eggs cooking too fast. Egg chunks in frosting is not ideal. 

I let this cook, stirring almost continuously, until it was nice and thick. I removed the pot from the heat and stirred in 1 1/3 cup coconut flakes and 1 cup chopped pecans. I let it cool on the stove top for a while and then cooled it even more in the fridge, till it was a spreadable consistency.

Layer 1

Layer 2 on Standby

All that was left was to assemble. I sliced the cake in half to get two round layers. I spread a thick layer of the coconut-pecan mixture all around and then carefully set the top layer back onto the cake. Then I spread the coconut-pecan frosting all around the top. All that was left was the birthday candles.

Deutscher Schokoladenkuchen!

6/7/8 Layer Magic Bars

1 Feb

Seven-layer bars are not anything new or exciting, but I had been craving these “magic bars” for days. I have no idea why — I haven’t had a seven-layer bar in years. But I pulled out my bar pan, and two trips to the grocery store later (I forgot stuff), I set to work on the bars. This is a classic recipe and can be found anywhere online or even on the back of a can of sweetened condensed milk. I probably know this one of the top off my head now, it’s so easy.

Graham Cracker & Butter Mixture
Once it was completely mixed, I pressed a small amount into each  of the 12 cups of the bar pan, pressing flat to make a solid crumb layer along the bottom.

Graham Cracker Crumb Layer
Then I set about filling up the layers. What I like about using the bar pan is that you can change up the ingredients. Someone doesn’t like nuts? Leave out the nuts on one row. No coconut? Leave out the coconut. What I don’t like about using the bar pan is that it takes more time, it’s difficult to spread the layers evenly, and it can be hard to remove the bars too. So if you want to use a normal baking pan and cut them into squares, that’s cool too.

Bar Layers
I managed to pry out a few bars and keep them whole, and they look delicious. (All the bars that I broke I dumped into a bowl and I just eat them with a fork. Talk about guilty pleasure.)

Magic Bars
I picked out the three best-looking bars and packaged them in a gift bag with a ribbon. Adorbs!

Magic Bars Gift Bag

I consider these true seven-layer bars because they include seven layers: graham cracker crust, white chocolate chips, dark chocolate chips, butterscotch chips, walnuts, coconut, and sweetened condensed milk. Other recipes do not include the white chocolate chips, but still call it seven layers by counting the butter that’s mixed into the graham cracker crust as a layer. And I call b.s. on that.

Be careful not to add in too much sweetened condensed milk, which is really easy to do in the small bar cups. I definitely should have used a spoon to drop in a small amount rather than being impatient and trying to pour it in. Some of my bars ended up with WAY too much sweetened condensed milk — these looked funny, and they were the ones that wouldn’t come out of the pan in one piece. Check out this picture — the bars in the front of the shot are nearly overflowing with sweetened condensed milk. Too much!Too Much!And next time I’ll probably add in the coconut at the end, after I spoon in the sweetened condensed milk. The coconut got kind of mushed under the weight of the milk, and it looks better when the coconut is fluffier.

Enjoy!

6/7/8 Layer Magic Bars

1 1/2 cups of graham cracker crumbs
1/2 cup melted unsalted butter
3/4 cup butterscotch chips
3/4 cup dark chocolate chips
3/4 cup white chocolate chips
1 cup chopped walnuts
1 cup shredded coconut
1 can of sweetened condensed milk

Preheat the oven to 350 F.

Mix the graham cracker crumbs and butter together. Press into the bottom of a bar pan or a 9×9 baking dish.

Layer on the chips and nuts evenly. Pour in the sweetened condensed milk. Spread the coconut evenly over top.

Bake for about 18 minutes, or until the edges are golden brown.

Let cool completely, and then carefully cut into squares and remove from pan.

Coconut Curry Chicken

29 Jan

Woo! Another dinner meal! Not baking, true, but a really beautiful dish that’s not too spicy and easy enough for a weeknight. This recipe, which I adapted from a recipe on allrecipes.com, served 2 — me and the BF. We generally don’t eat very much, so feel free to increase the ingredients here if you’re an average-to-big eater.

I started off by dicing up a couple chicken breasts and setting them aside. In a medium bowl, I mixed together 1 teaspoon cumin, 1 teaspoon cayenne pepper, 1 teaspoon turmeric, 1 teaspoon ground coriander, and 1 teaspoon curry powder. Basically, just add in whatever you have in your spice rack. If you’re missing one or two of these things, don’t worry, just go with what you have. I also added in a dash of salt and a dash of pepper. I threw the chicken into the spice bowl and tossed it around until all the pieces were well-coated.

I heated about a tablespoon of olive oil in a skillet over medium heat and then browned the chicken. Once it was brown, but not fully cooked, I moved the pieces to the outside of the pan and added in 1/2 sliced onion, 1/4 sliced green bell pepper, 1/4 sliced yellow bell pepper, 1/4 sliced red bell pepper and 1 tablespoon minced garlic. (The onions and peppers were julienne cut. They were frozen from the leftovers of another dinner. It is not necessary to have different colored bell peppers — they all taste the same. So unless you have leftovers or plan on saving the leftovers from this recipe, just pick one bell pepper and go with it.) I cooked those till the onions became almost clear. Then I dumped in 1 can of diced tomatoes — you can choose whatever variety you like, but I usually get the ones that already have flavors roasted into them, like the one with basil, garlic, and oregano. I stirred everything up, turned the heat down to a medium-low simmer, and cooked everything for another 6-8 minutes. Then I stirred in 1/2 (8 oz) can of coconut milk. Another minute to heat it through, and I was ready to serve!

Cookin' Curry
I served it up on top of bowls of jasmine rice and served naan on the side. (If you’re lucky enough to have a Trader Joe’s where you live, get your frozen garlic naan from there. It’s easy, cheap, and delicious. I guess if you’re crazy, you could find a recipe online and make it yourself.)

Dinner Is Served

How Sue Sees It:
– I personally thought this was a little bland, but super-flavorful foods tend to be my favorite, like Indian curries, so I think I’m just picky. The BF liked this pretty well.
– You can use regular or light coconut milk, whichever you prefer. Just be sure to shake it up before you open the can.
– Next time I will probably experiment with more healthful ingredients, like chickpeas, eggplant, cauliflower, green beans, etc.

Coconut Cupcakes

20 Jan

I recently brought cupcakes to a coworker’s going away party. I tricked her into telling me that one of her favorite desserts is coconut cupcakes — well, not sure I had her fooled, I think she just went along with it, but that’s cool — then I set about finding the perfect recipe to test out. I adjusted a basic cupcake recipe to include both flaked coconut and coconut milk in the batter, and topped half with (what else?) a coconut cream cheese frosting and the other half with a chocolate coconut frosting.

For the cake: In a large bowl, I used the hand mixer to cream together 2 cups white sugar and 3/4 cup butter. I added 3 eggs and beat well. In another bowl, I whisked together  2 1/2 cups all-purpose flour and  2 1/2 teaspoons baking powder. I added this mixture into the butter mixture, alternating with adding 1 cup coconut milk. I added in 1 teaspoon vanilla and then beat the entire thing well.

Coconut Cupcake Batter
I filled a muffin pan with cupcake paper liners and filled the muffin tins about 2/3 of the way with the batter. Then I baked them at 350 degrees for about 18-20 minutes (a toothpick came out clean when I poked them).

Cupcakes in the Oven
I let them cool completely and then covered half of them with a coconut cream cheese frosting. This was super easy: I made my standard cream cheese frosting, adding 2 tablespoons coconut milk when I mixed it up. After it was mixed, I stirred in 1/2 cup shredded coconut. Yum!

The 4 Cs!
For the other half of the cupcakes, I covered them with a super-rich chocolate coconut frosting. Double yum! To make sure the coconut flavor was strong enough, I topped all the cupcakes with extra shredded coconut. Don’t skip this step! The flavors of the cake and the two frostings can really outweigh the coconut flavor without the extra on top.

Chocolate Coconut Frosting
At the party, I set up my cupcake tower and alternated the cupcakes in a black-white-black-white pattern. It looked super awesome!

Coconut Cupcakes

How Sue Sees It:

I really like these because the coconut is there, but not too strong. They also looked really cool alternating between black and white cupcakes on display. But frankly — and this may just be the chocoholic in me — the best part of this project was the chocolate frosting.

Best Chocolate Frosting Ever

17 Jan

I mixed up this chocolate frosting to cover some coconut cupcakes, and it is TO DIE FOR. It tastes like a chocolate bar turned into cream on top of a cupcake. I will mos def be using this for future baking projects.

With a hand mixer, I creamed 1/2 cup softened butter in a large bowl. I added in  2 1/4 cups powdered sugar and 3/4 cup cocoa. Then I added 1/4 teaspoon vanilla and blended in enough milk to make it a spreadable consistency — about 1/4 cup milk.

[UPDATE: I was making this with Betsy for a cake the other day, and she pointed out that I don’t read very well. Apparently I’ve been using ground sweetened chocolate, which is totally different than cocoa powder. As in, one has additional sugar, and one doesn’t. No wonder this frosting tastes amazing! It’s got about a million times more sugar than an average frosting. SOOO…. if you want a super delicious frosting that may induce diabetic shock, I recommend using Ghiradelli Sweet Ground Chocolate. 01/21/12]

DELICIOUS. This is just the classic version. To cover my coconut cupcakes, I decided they needed more of a coconut flavor, so I whipped up another batch…

Chocolate Frosting

CHOCOLATE COCONUT FROSTING: In this one, I substituted  1/4 cup coconut milk for the regular milk, and then stirred in 1/2 cup shredded coconut. Still mostly a chocolate flavor, with a slight hint of coconut. Perfect for my cupcakes!

Chocolate Coconut Cupcakes

How Sue Sees It:
All I have to say is: try this on EVERYTHING!

Chocolate Coconut Sandwich Cookies

4 Jan

I made these delicious sandwich cookies about a month ago and completely forgot to post them! They’re very classy – sure to impress. I took them to an office holiday party, and they completely disappeared. Here’s the basic plan: make some sugar cookies, shape them into balls, roll them in coconut, bake, then sandwich them together between melted chocolate. Yum!

I pre-heated the oven to 350 F. In a bowl, I whisked together 1 cups all-purpose flour, 1/2 teaspoon baking powder, and  1/2 teaspoon salt.

In another bowl, I beat together 1 1/2 sticks softened unsalted butter, 1/2 cup white sugar, and 1/2 cup packed brown sugar on medium for about 3 minutes. I then beat in 1 large egg and 1 teaspoon vanilla extract. I turned the mixer to low and gradually added in the flour mixture, mixing until just combined.

Batter Ingredients
Shredded Coconut

I popped the dough in the fridge for a little while to firm it up and prepared a plate of coconut flakes. After I pulled the dough out, I rolled little one-inch dough balls, rolled them in the coconut, and placed them about 2 inches apart on a cookie sheet lined with parchment paper.

Coconut Dough Balls

I baked them for about 10 or 12 minutes, rotating halfway through, until they were a light golden color around the edges. I moved them to a rack until they were cooled completely.

Coconut Cookies

I melted some milk chocolate and spread it on a quarter of the cookies, topping them with the other cookies to make milk chocolate coconut sandwiches. Then I melted some dark chocolate and spread it on the rest of the batch to make dark chocolate coconut sandwiches. The whole process took quite a while, baking multiple batches of cookies, waiting for them to cool, and then sandwiching the chocolate, but it was well worth it!

Cookie Sandwiches


How Sue Sees It:
– This recipe made about 20 sandwich cookies, with a couple extra coconut cookies that cracked or toasted a little too much. I served the milk chocolate and the dark chocolate separated on matching square platters. Classy!
– The coconut flavor was delicious, but not very strong. Next time, I would probably mix about a cup and a half of coconut into the batter. I’d still roll it in coconut, because it looks cool.
– To give this a more wintery, holiday vibe: Roll your dough balls a little smaller so that the final sandwich cookie is more of a round shape. Switch up the filling to white chocolate or vanilla buttercream filling (1 stick of butter, 1 cup confectioners sugar, and 1 teaspoon vanilla, blended on medium-high until pale and fluffy). Roll the final ball in coconut again so that you have fresh coconut sticking to the middle filling. Now you have a coconut snowball!